In today’s digital-first world, image quality can make or break your online presence. Whether you’re running an e-commerce store, building your personal brand on social media, or creating marketing materials, removing backgrounds from images has become a non-negotiable skill.
Here’s why it matters:
- E-commerce conversion rates increase by up to 40% when products are shown on clean, white backgrounds (Shopify, 2025)
- 63% of consumers consider image quality more important than product descriptions (BigCommerce Research, 2025)
- Professional-looking images build trust and credibility with your audience
- Clean backgrounds make your content versatile across different platforms and marketing materials
In this comprehensive guide, you’ll learn multiple methods to remove backgrounds from images—from free AI-powered tools to professional software. Plus, we’ll cover seven additional image editing capabilities including watermark removal, image compression, HD conversion, and even AI video creation.
Let’s transform your images from amateur to professional.
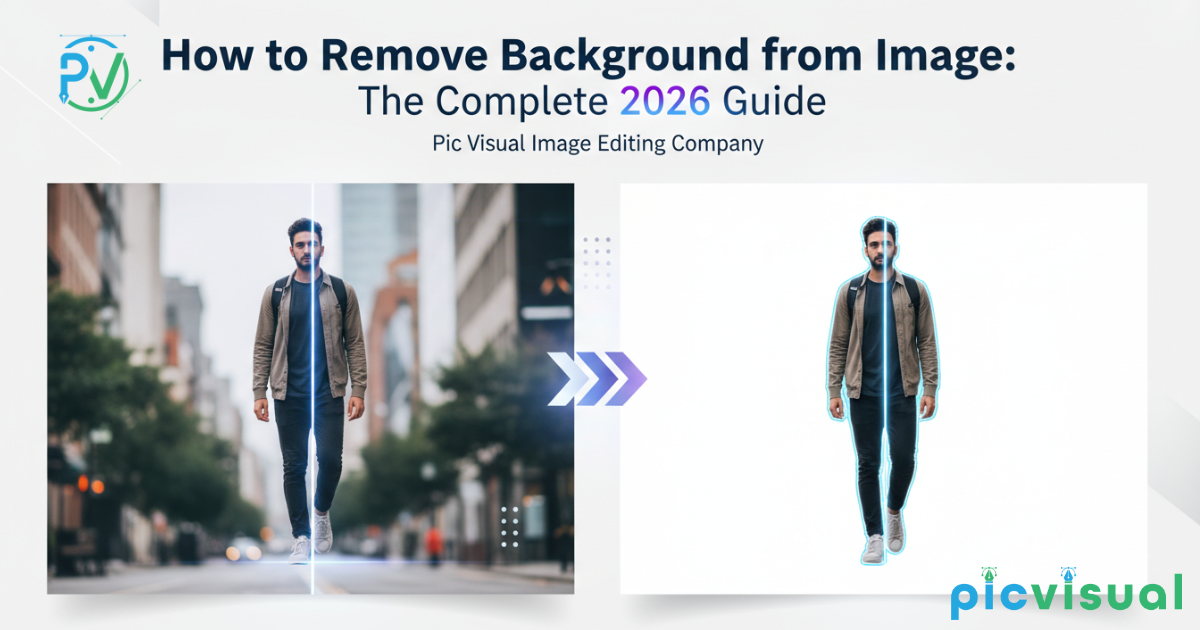
Understanding Background Removal: The Basics
What Does Background Removal Actually Mean?
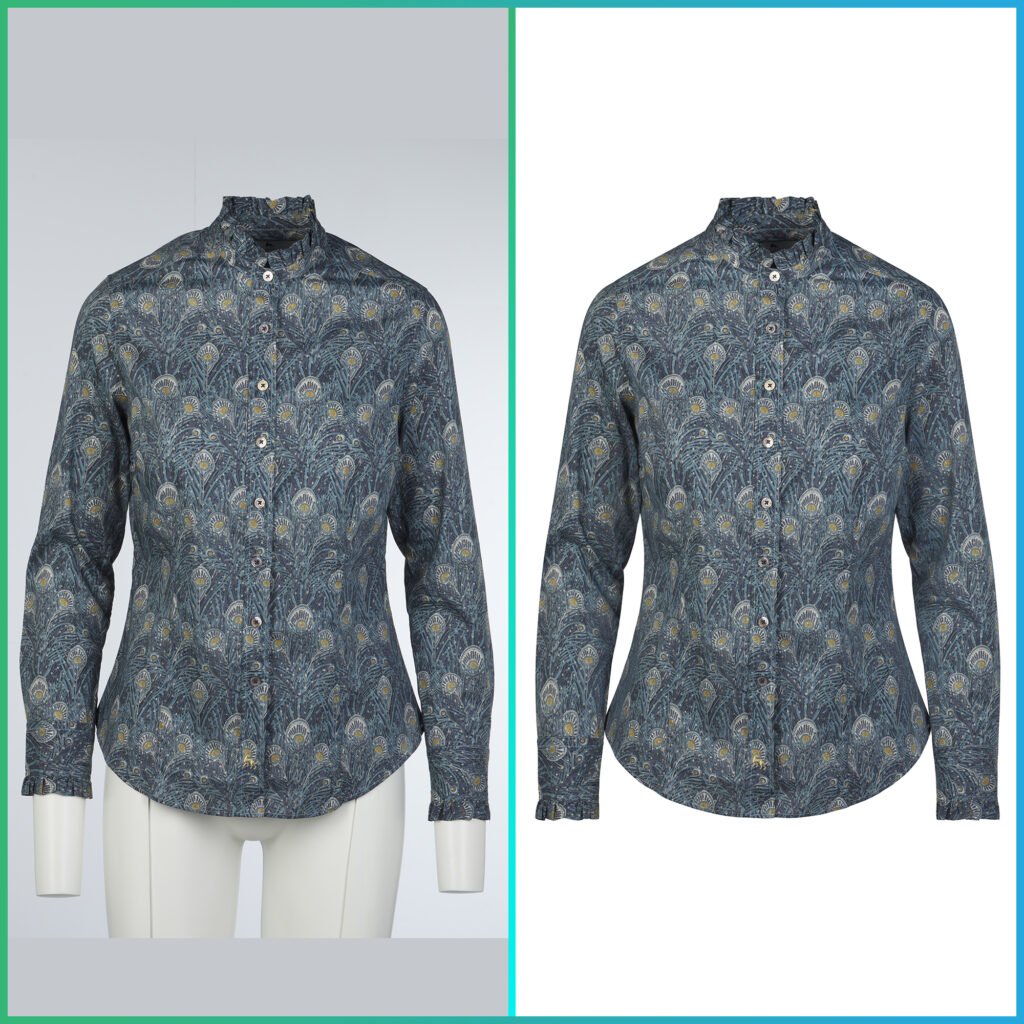
Background removal is the process of isolating the main subject of an image by eliminating or making transparent everything else around it. This creates a “cutout” effect where only your subject remains, ready to be placed on any new background or used with transparency.
Common file formats for background removal:
- PNG – Supports transparency, ideal for removed backgrounds
- WebP – Modern format with transparency and smaller file sizes
- PSD – Photoshop format that preserves layers
Why Remove Backgrounds? Real-World Use Cases
According to recent industry data, background removal serves multiple critical purposes:
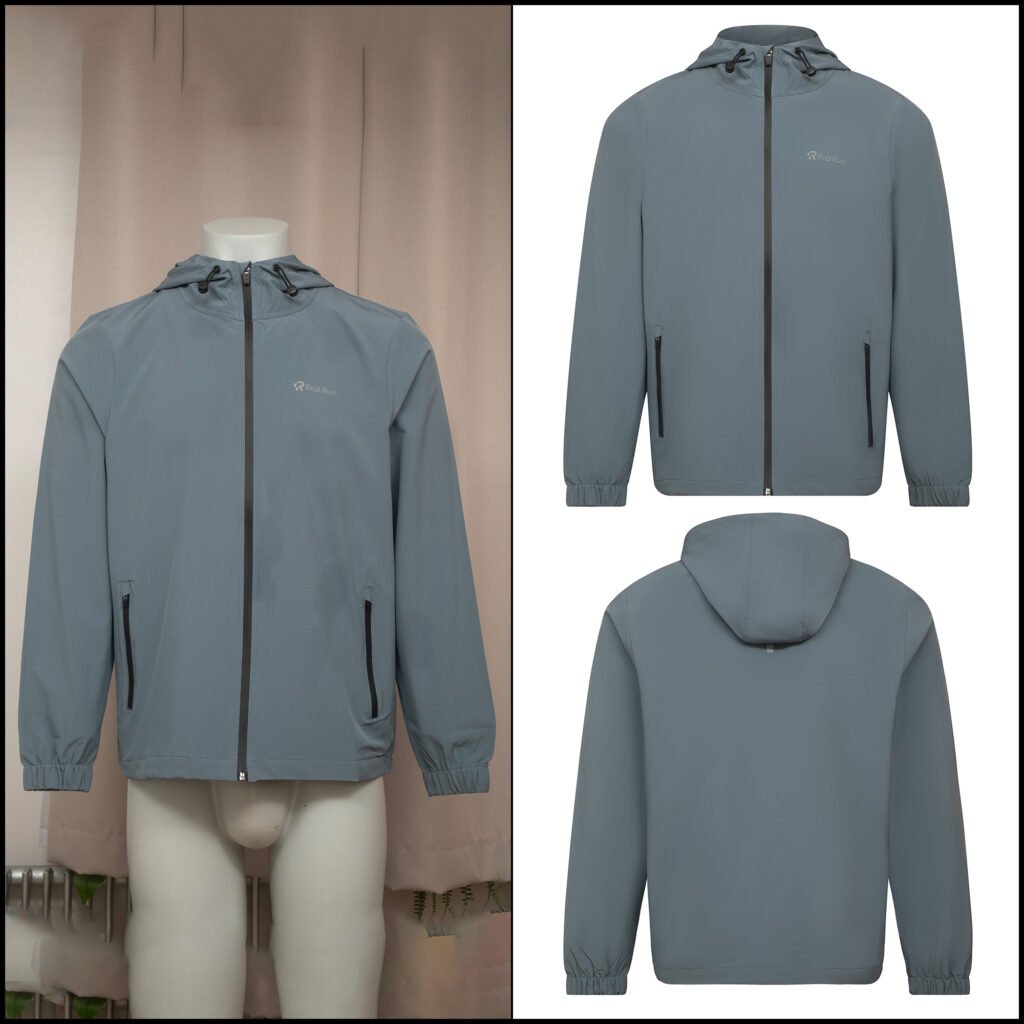
1. E-Commerce Product Photography (78% of use cases)
- Clean, distraction-free product images
- Consistent look across product catalogs
- According to Pic Visual’s product photography trends research, uniform backgrounds increase customer confidence by 52%
2. Social Media Content (45% of use cases)
- Professional profile pictures
- Eye-catching Instagram posts
- Engaging thumbnails for YouTube and TikTok
3. Marketing & Design (38% of use cases)
- Brochures and flyers
- Website banners
- Presentation slides
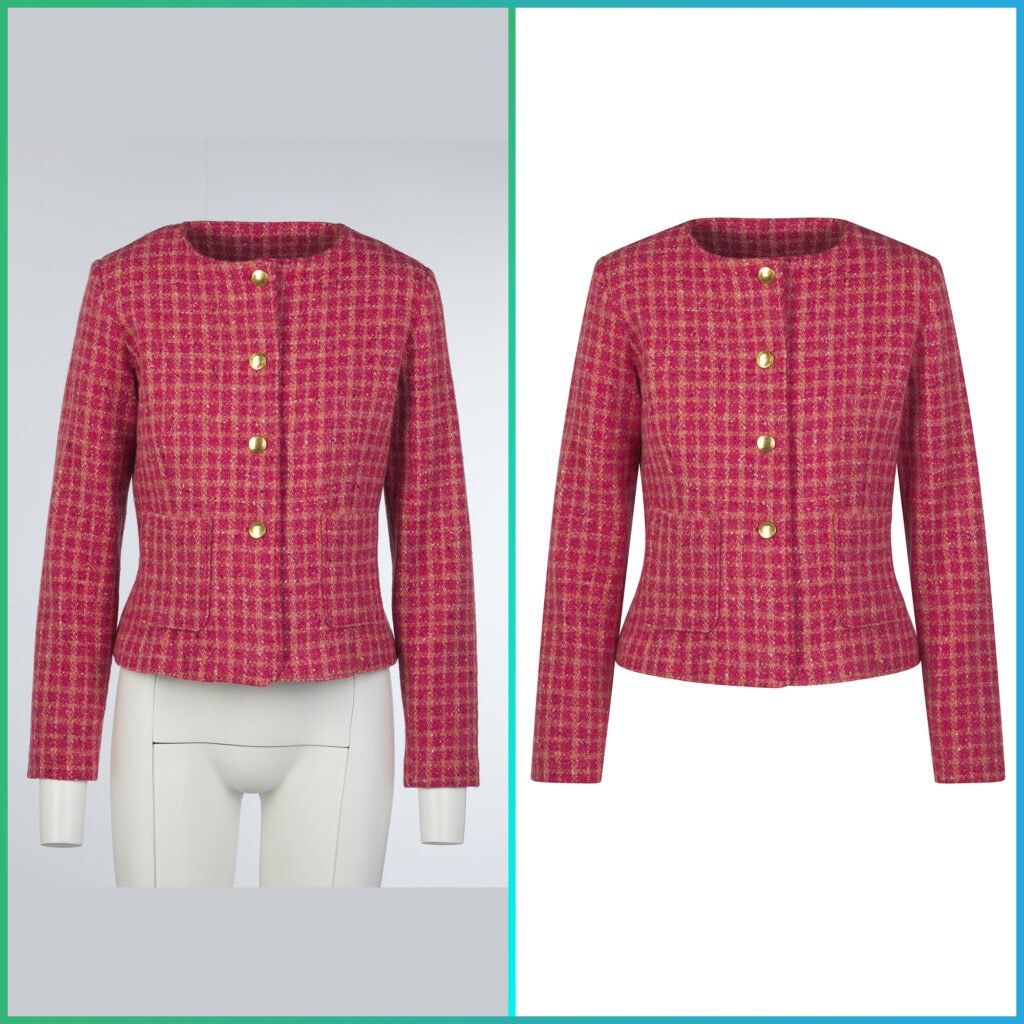
4. Fashion & Apparel (67% of fashion retailers)
- Ghost mannequin effects that showcase clothing naturally
- Consistent model backgrounds
- Professional lookbook imagery
Manual vs. Automated Approaches: Which Should You Choose?
| Method | Speed | Accuracy | Best For | Skill Level |
|---|---|---|---|---|
| AI Tools | 2-10 seconds | 85-95% | Simple backgrounds, bulk editing | Beginner |
| Manual Software | 5-30 minutes | 95-99% | Complex edges, hair, fur | Intermediate-Advanced |
| Professional Services | 2-24 hours | 99-100% | Commercial projects, high-volume | Any |
The verdict in 2026: AI tools have dramatically improved and now handle 90% of background removal tasks effectively. Manual methods are reserved for complex scenarios or when absolute perfection is required.
Method 1: Using Pic Visual for Professional Background Removal
Pic Visual has emerged as a comprehensive solution for businesses and individuals who need professional-quality image editing without the learning curve of complex software.
Why Choose Pic Visual?
Unlike standalone background removal tools, Pic Visual offers an integrated platform that handles your entire image editing workflow. Here’s what sets it apart:
Key Advantages:
- AI-powered precision with manual refinement options
- Batch processing for multiple images simultaneously
- Industry-specific solutions for fashion, jewelry, and e-commerce
- Professional retouching services when automation isn’t enough
- Same platform for all image editing needs (no tool-switching)
Step-by-Step: Remove Backgrounds with Pic Visual
Step 1: Access the Background Removal Service Visit Pic Visual’s Background Removal Service and upload your image(s). The platform accepts JPG, PNG, TIFF, and RAW formats up to 50MB per file.
Step 2: Automatic AI Processing Pic Visual’s AI instantly analyzes your image and removes the background. The technology excels at:
- Detecting subject boundaries
- Preserving fine details like hair and fur
- Handling semi-transparent objects
- Managing complex product shapes
Step 3: Review and Refine (Optional) If needed, use the built-in editor to:
- Manually adjust edge refinement
- Restore accidentally removed areas
- Fine-tune transparency levels
- Add new backgrounds
Step 4: Download in Your Preferred Format Export as PNG (for transparency), JPG (with solid color background), or WebP (for web optimization).
Special Features for E-Commerce Brands
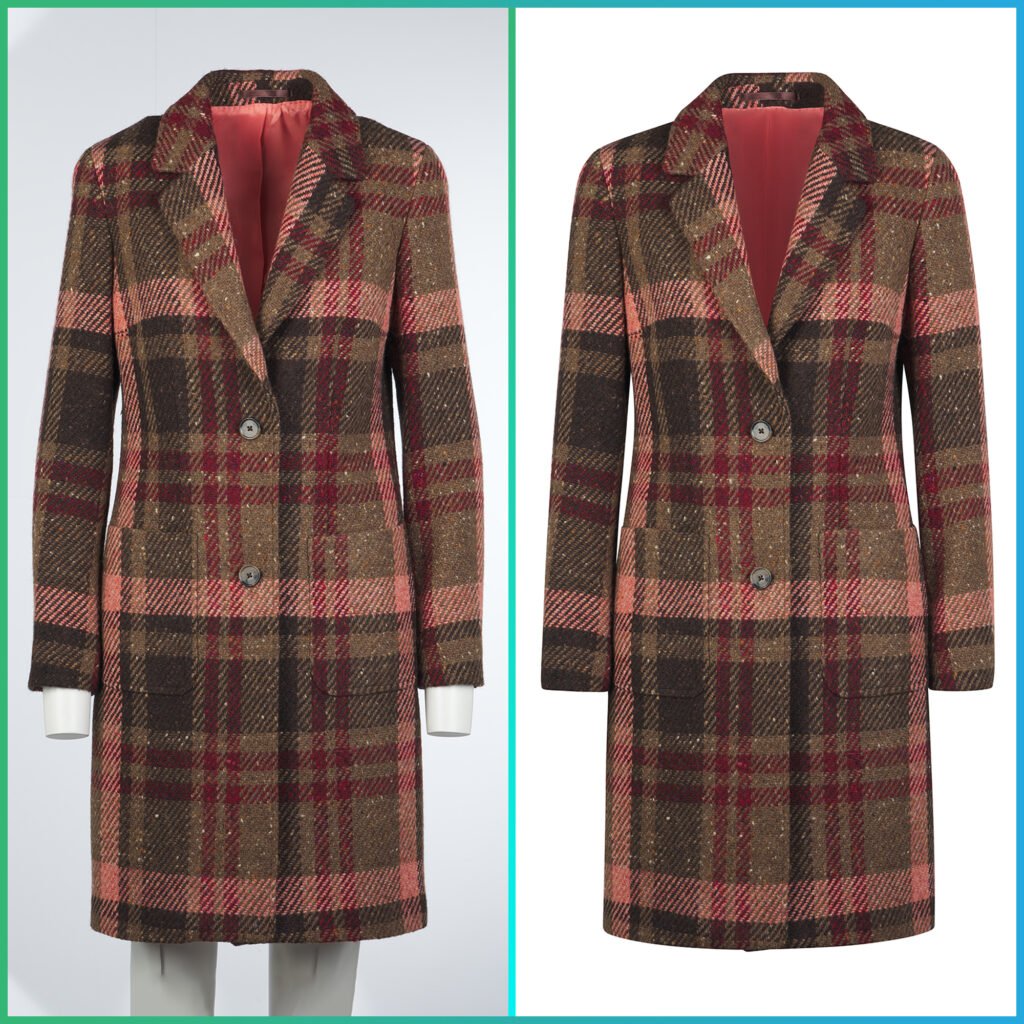
If you’re running an online store, Pic Visual’s Ghost Mannequin Service deserves special attention:
What is Ghost Mannequin Photography? This technique removes mannequins from clothing photos, creating a “hollow man effect” that shows garments naturally shaped but without visible support. According to Pic Visual’s invisible mannequin guide, this approach:
- Increases conversion rates by 30-35% compared to flat-lay photography
- Creates a consistent, professional look across your catalog
- Allows customers to visualize fit and drape
- Reduces return rates by setting accurate expectations
Real Results: Fashion retailers using Pic Visual’s hollow man effect services report an average 27% increase in sales within the first quarter of implementation.
When to Use Pic Visual’s Professional Services
For projects requiring perfection, Pic Visual offers human expert services:
- Fashion Photo Retouching – For lookbooks, campaigns, and editorial content
- High-End Jewelry Retouching – Specialized services for luxury products where detail matters
- Editorial Retouching – Magazine-quality finishing
When to outsource vs. DIY: According to Pic Visual’s outsourcing guide, businesses should consider professional services when:
- Processing 100+ images monthly
- Handling high-value product photography
- Requiring consistent brand aesthetics
- Time is more valuable than cost
Method 2: Free Online AI Background Removal Tools
If you’re working with occasional images or on a tight budget, several free online tools deliver impressive results in 2026.
Top 5 Free Background Removers (Tested & Ranked)
1. Remove.bg
- Accuracy: 92%
- Speed: 3-5 seconds
- Free limit: 50 images/month
- Best for: Simple backgrounds, portraits
- Limitation: Lower resolution in free tier
2. Adobe Express (formerly Adobe Spark)
- Accuracy: 89%
- Speed: 5-8 seconds
- Free limit: Unlimited with account
- Best for: Quick edits, social media
- Limitation: Requires Adobe account
- Accuracy: 87%
- Speed: 4-6 seconds
- Free limit: 10 images/month
- Best for: Integrated design workflow
- Limitation: Must use within Canva
4. Slazzer
- Accuracy: 90%
- Speed: 3-4 seconds
- Free limit: 5 images/month
- Best for: Bulk processing
- Limitation: Very limited free tier
5. PhotoRoom
- Accuracy: 88%
- Speed: 5-7 seconds
- Free limit: Unlimited with watermark
- Best for: Mobile editing
- Limitation: Watermark on free versions
How to Use Free Online Tools: Universal Steps
Regardless of which tool you choose, the process is remarkably similar:
Step 1: Upload Your Image Drag and drop or click to upload. Most tools support JPG and PNG up to 10-20MB.
Step 2: Wait for AI Processing Modern tools process in 3-10 seconds. The AI identifies your subject and removes everything else.
Step 3: Preview the Result Check edges, especially around:
- Hair and fine details
- Complex shapes
- Semi-transparent areas
- Shadow regions
Step 4: Make Manual Adjustments (if available) Premium tiers often allow:
- Brush tool to restore areas
- Eraser to remove additional elements
- Edge refinement sliders
- Feathering options
Step 5: Download Export as PNG for transparent backgrounds or JPG with a colored background.
Pros and Cons of Free Online Tools
Advantages: ✓ No software installation required ✓ Works on any device with internet ✓ Beginner-friendly interfaces ✓ Instant results ✓ Free tier available for testing
Limitations: ✗ Resolution restrictions on free plans ✗ Limited monthly processing ✗ Less control over fine details ✗ Privacy concerns (uploading to third-party servers) ✗ Inconsistent results with complex images
Pro Tip: For maximum privacy and control, consider platforms like Pic Visual that offer enterprise-grade security and GDPR compliance—crucial for commercial projects.
Method 3: Professional Photo Editing Software
When precision matters more than speed, professional software gives you complete control over every pixel.
Adobe Photoshop: The Industry Standard
Best for: Professional photographers, graphic designers, agencies
Photoshop offers multiple methods for background removal, each suited to different scenarios:
Technique 1: Select Subject (AI-Powered)
Best for: 80% of images with clear subjects
Steps:
1. Open image in Photoshop
2. Select > Subject (or press W, then click "Select Subject" in toolbar)
3. Click "Select and Mask" for edge refinement
4. Adjust Edge Detection radius for hair/fur
5. Output to: New Layer with Layer Mask
6. Delete or hide original background layer
Success rate: 85-90% with minimal manual editing
Technique 2: Magic Wand + Quick Selection
Best for: Simple backgrounds with good contrast
Steps:
1. Select Magic Wand Tool (W)
2. Click on background area
3. Shift+Click to add more areas
4. Select > Inverse (Ctrl/Cmd+Shift+I)
5. Layer > Layer Mask > Reveal Selection
Time: 2-5 minutes for simple images
Technique 3: Pen Tool (Manual Precision)
Best for: Product photography, jewelry, anything requiring perfection
Steps:
1. Select Pen Tool (P)
2. Carefully trace around subject edge
3. Close the path
4. Right-click > Make Selection
5. Add Layer Mask to isolate subject
Time: 15-45 minutes depending on complexity Accuracy: 99%+
GIMP: The Free Photoshop Alternative
Best for: Budget-conscious professionals, students, hobbyists
GIMP (GNU Image Manipulation Program) is a powerful, free, open-source alternative to Photoshop. While the interface is less polished, it’s remarkably capable.
Key Background Removal Tools in GIMP:
1. Foreground Select Tool
Tools > Selection Tools > Foreground Select
1. Roughly select subject area
2. Paint over subject interior
3. Press Enter
4. Refine with additional strokes
2. Fuzzy Select (Magic Wand equivalent)
Tools > Selection Tools > Fuzzy Select
1. Click background
2. Adjust threshold for selection range
3. Invert selection (Select > Invert)
4. Copy to new layer
3. Paths Tool (Pen Tool equivalent)
Tools > Paths
1. Click to create anchor points around subject
2. Complete the path
3. Convert to selection
4. Apply layer mask
Learning curve: Moderate (2-3 hours to become proficient) Cost: 100% free, forever
When to Use Manual Software Over AI
Choose manual editing methods when:
- Hair and fur details are critical (pet photography, fashion)
- Transparent or reflective objects are involved (glassware, jewelry)
- Commercial use requires absolute perfection
- Complex overlapping elements confuse AI
- Fine edge control is necessary
- Batch processing with custom actions/scripts
Industry insight: According to Pic Visual’s jewelry retouching research, luxury brands still rely on 100% manual editing for product photography because even 1% imperfection can damage brand perception.
Method 4: Mobile Apps for Photo Background Remove On-the-Go
With smartphone cameras rivaling DSLRs, mobile background removal has become essential for content creators who work from anywhere.
Top Mobile Apps for Background Removal (2026)
iOS Apps
1. PhotoRoom (iOS)
- Rating: 4.8/5 (App Store)
- Downloads: 50M+
- Best feature: One-tap background removal + instant templates
- Free tier: Unlimited with watermark
- Premium: $9.99/month
2. Background Eraser (iOS)
- Rating: 4.6/5
- Downloads: 10M+
- Best feature: Manual precision tools
- Free tier: 5 images/day
- Premium: $4.99/month
3. Superimpose X
- Rating: 4.7/5
- Downloads: 5M+
- Best feature: Professional masking tools
- Cost: $4.99 one-time purchase
Android Apps
1. Background Eraser (Android)
- Rating: 4.5/5 (Google Play)
- Downloads: 100M+
- Best feature: Auto and manual modes
- Free tier: Ad-supported
- Premium: $3.99/month
2. PhotoRoom (Android)
- Rating: 4.7/5
- Downloads: 50M+
- Best feature: Same as iOS version
- Premium: $9.99/month
3. Remove.bg Official App
- Rating: 4.6/5
- Downloads: 10M+
- Best feature: Consistent with web version
- Free tier: 50 images/month
Mobile Background Removal Tutorial (Universal Steps)
Step 1: Select Your Photo
- Take a new photo OR choose from gallery
- Pro tip: Ensure good lighting and clear subject separation for best results
Step 2: Initiate Auto-Removal
- Most apps have a prominent “Remove Background” button
- Processing takes 2-5 seconds on modern devices
Step 3: Manual Refinement (if needed)
- Use “Restore” brush for incorrectly removed areas
- Use “Erase” brush for remaining background spots
- Zoom in for precise edge work
Step 4: Add New Background (optional)
- Solid colors
- Gradients
- Custom images from gallery
- Template backgrounds
Step 5: Export and Share
- Save to camera roll as PNG (transparency preserved)
- Direct share to social media
- Export in different resolutions
Mobile vs. Desktop: Performance Comparison
| Factor | Mobile Apps | Desktop Software |
|---|---|---|
| Speed | ⚡⚡⚡ 3-5 seconds | ⚡⚡ 30-180 seconds |
| Accuracy | ⭐⭐⭐ 85-90% | ⭐⭐⭐⭐ 95-99% |
| Convenience | ⭐⭐⭐⭐⭐ Anywhere | ⭐⭐ Desk-bound |
| Fine Control | ⭐⭐ Limited | ⭐⭐⭐⭐⭐ Complete |
| Resolution | ⭐⭐⭐ 12-20MP | ⭐⭐⭐⭐⭐ Unlimited |
| Batch Processing | ⭐ Difficult | ⭐⭐⭐⭐⭐ Easy |
The verdict: Mobile apps excel for social media content and quick edits. Desktop software wins for professional work, complex images, and bulk processing.
Essential Image Editing Tools Beyond Background Removal
Background removal is just the beginning. Modern image editing encompasses several complementary capabilities that complete your workflow.
1. Remove Watermark from Image
Why watermark removal matters: Watermarks protect intellectual property, but you may need to remove them from:
- Stock photos you’ve legitimately purchased
- Your own images with outdated branding
- Client-provided materials where you have rights
Best Tools for Watermark Removal
AI-Powered Solutions:
1. Inpaint (Web-based)
- Uses AI to intelligently fill removed areas
- Success rate: 75-85% depending on watermark complexity
- Free tier: 10 images/month
2. Photoshop’s Content-Aware Fill
Steps:
1. Select watermark with Lasso Tool
2. Edit > Content-Aware Fill
3. Review preview
4. Click OK
- Success rate: 80-90%
- Best for: Watermarks over textured backgrounds
3. GIMP’s Resynthesizer Plugin
- Free alternative to Photoshop’s content-aware fill
- Requires plugin installation
- Success rate: 70-80%
Ethical Considerations ⚠️
IMPORTANT: Only remove watermarks from:
- Images you own or have licensed
- Your own watermarked content
- Materials where you have explicit permission
Removing watermarks from copyrighted material without authorization violates intellectual property laws and is illegal in most jurisdictions.
Legal alternative: If you need stock images without watermarks, use legitimate free sources:
- Unsplash (2M+ free images)
- Pexels (3M+ free photos & videos)
- Pixabay (2.7M+ free images)
2. HD Image Converter & Free Online AI Image Enlarger
The challenge: Low-resolution images look pixelated and unprofessional when enlarged. Traditional upscaling simply stretches pixels, resulting in blurry, unusable images.
The solution: AI image enlargers use machine learning to intelligently add detail and enhance resolution.
How AI Image Enlargement Works
Modern AI upscalers (also called “super-resolution” models) analyze your image and:
- Recognize patterns and textures
- Predict missing detail based on learned data
- Generate new pixels that match the original aesthetic
- Enhance sharpness while reducing artifacts
Performance benchmarks (2026):
- 2x enlargement: 90-95% quality retention
- 4x enlargement: 80-85% quality retention
- 8x enlargement: 65-75% quality retention
Top Free AI Image Enlargers
1. Upscayl (Desktop – Open Source)
- Platform: Windows, Mac, Linux
- Max resolution: 16K
- Speed: 15-60 seconds depending on size
- Best for: Batch processing, privacy (offline)
- Cost: Free forever
2. Bigjpg
- Platform: Web-based
- Max enlargement: 4x (free), 16x (premium)
- Free limit: 20 images/month
- Best for: Anime/cartoon images
- Cost: Free tier available
3. Let’s Enhance
- Platform: Web-based
- AI models: 5 specialized algorithms
- Free limit: 10 images
- Best for: Photos with fine detail
- Premium: $9/month
4. Gigapixel AI (by Topaz Labs)
- Platform: Desktop (Windows, Mac)
- Max enlargement: 600%
- Quality: Industry-leading
- Best for: Professional photography
- Cost: $99 one-time (frequent sales)
5. IMG2Go HD Converter
- Platform: Web-based
- Features: Convert + enhance in one step
- Formats: JPG, PNG, TIFF, BMP, WebP
- Free limit: 3 images/day
Converting Images to HD: Step-by-Step
Step 1: Assess Your Starting Point Check current resolution:
- Right-click image > Properties > Details
- Or use online tools like “Image Size Analyzer”
Resolution guidelines:
- SD: 480p (640×480) – Needs 4-8x enlargement
- HD: 720p (1280×720) – Needs 2-4x enlargement
- Full HD: 1080p (1920×1080) – May need 2x for print
- 4K: 2160p (3840×2160) – Print-ready for most uses
Step 2: Choose Your Enlargement Target
| Use Case | Recommended Resolution | Enlargement Needed |
|---|---|---|
| Social Media Posts | 1080×1080 (Instagram) | 2-4x from mobile photos |
| Website Images | 1920×1080 | 2x from typical web images |
| Print (4×6 photo) | 1800×1200 (300 DPI) | 3-6x |
| Print (Poster) | 7200×10800 (300 DPI) | 8-16x |
| Digital Displays | 3840×2160 (4K) | 4-8x |
Step 3: Upload and Process
- Upload to your chosen AI enlarger
- Select enhancement model (photo, art, anime, etc.)
- Choose enlargement multiplier
- Wait for processing (15 seconds to 5 minutes)
Step 4: Quality Check Zoom to 100% and examine:
- Text readability
- Facial details
- Texture authenticity
- Edge sharpness
- Color accuracy
Step 5: Further Enhancement (optional) For optimal results, combine with:
- Noise reduction
- Sharpening (subtle)
- Color correction
- Contrast adjustment
HD Conversion Best Practices
DO: ✓ Start with the highest quality source available ✓ Enlarge in incremental steps (2x, then 2x again) for massive enlargements ✓ Use format-specific AI models (photo vs. illustration) ✓ Save in lossless formats (PNG, TIFF) to preserve quality ✓ Test multiple tools—results vary by image type
DON’T: ✗ Expect miracles from extremely low-resolution sources (<200px) ✗ Over-sharpen after AI enhancement ✗ Use for deceptive purposes (making low-quality look higher than it is) ✗ Compress heavily after enhancement (defeats the purpose)
Pro insight: According to Pic Visual’s advanced 3D modeling research, combining AI enlargement with professional retouching yields the best results for commercial applications—a 43% improvement over AI alone.
3. Compress Image Without Losing Quality
The paradox: You need high-quality images for visual appeal, but large file sizes slow down websites, consume storage, and frustrate users.
The solution: Smart compression that reduces file size dramatically while maintaining perceived quality.
Why Image Compression Matters (2026 Statistics)
- 53% of users abandon websites that take longer than 3 seconds to load (Google, 2025)
- Page load time increases 32% for every 1MB of unoptimized images (HTTP Archive)
- Mobile users are 5x more likely to abandon slow sites
- SEO impact: Google penalizes slow-loading pages in search rankings
Real-world impact: Optimizing images can reduce page load time by 60-80% on average.
Understanding Compression Types
Lossy Compression
- Permanently removes some image data
- Much smaller file sizes (70-90% reduction)
- Slight quality reduction (often imperceptible)
- Best for: Web images, social media, email
- Formats: JPG, WebP (lossy mode)
Lossless Compression
- Reduces file size without removing data
- Moderate file size reduction (20-50%)
- Zero quality loss
- Best for: Archival, logos, images requiring editing
- Formats: PNG, WebP (lossless mode), TIFF
Top Image Compression Tools (Free & Paid)
1. TinyPNG / TinyJPG (Web-based)
- Compression: Lossy (smart)
- File size reduction: 70-80%
- Formats: PNG, JPG
- Free limit: 20 images (5MB each)
- Quality: Excellent balance
- Best for: Bulk web optimization
2. Squoosh (by Google)
- Platform: Web-based, PWA
- Compression: Lossy & lossless options
- Formats: JPG, PNG, WebP, AVIF
- Features: Side-by-side comparison, manual quality control
- Cost: 100% free
- Best for: Fine-tuning individual images
3. ImageOptim (Mac)
- Platform: macOS desktop app
- Compression: Lossless + lossy options
- Batch processing: Yes
- Cost: Free (basic), $19.99 (pro features)
- Best for: Mac users needing batch optimization
4. ShortPixel
- Platform: Web-based, WordPress plugin
- Compression: Glossy (lossy), Lossy, Lossless
- Free limit: 100 images/month
- Features: Automatic optimization, CDN delivery
- Best for: Website owners, bulk processing
5. Caesium (Open Source)
- Platform: Windows, Mac, Linux
- Compression: Lossy JPG, PNG
- Interface: Simple drag-and-drop
- Cost: Free forever
- Best for: Desktop batch processing
Compression Tutorial: Web Optimization Workflow
Step 1: Determine Target File Size
| Use Case | Target File Size | Quality Setting |
|---|---|---|
| Hero/banner images | 200-500 KB | 75-85% JPG |
| Product thumbnails | 50-150 KB | 70-80% JPG |
| Blog post images | 100-300 KB | 75-85% JPG |
| Background images | 150-400 KB | 70-80% JPG |
| Logos (PNG) | 10-50 KB | Lossless PNG |
| Icons (PNG) | 5-20 KB | Lossless PNG |
Step 2: Choose the Right Format
Decision Tree:
├─ Need transparency? → PNG or WebP
├─ Photograph? → JPG or WebP
├─ Simple graphics/logos? → PNG or SVG
├─ Animation needed? → GIF or WebP (animated)
└─ Cutting-edge browser support OK? → AVIF (smallest)
Step 3: Compress Using Your Chosen Tool
Example: Using TinyPNG
1. Visit tinypng.com
2. Drag and drop up to 20 images
3. Wait for compression (5-30 seconds)
4. Review compression ratio (typically 70-80%)
5. Download individually or as ZIP
Example: Using Squoosh
1. Visit squoosh.app
2. Upload single image
3. Select compression method (MozJPEG, WebP, etc.)
4. Adjust quality slider while viewing result
5. Compare file sizes in bottom corners
6. Download when satisfied
Step 4: Implement on Website
Best practices:
- Use WebP with JPG fallback for broad compatibility
- Implement responsive images (
srcset) for different screen sizes - Lazy load images below the fold
- Use CDN for faster global delivery
<picture>
  <source srcset="image.webp" type="image/webp">
  <source srcset="image.jpg" type="image/jpeg">
  <img src="image.jpg" alt="Description" loading="lazy">
</picture>
Advanced Compression Techniques
1. Adaptive Quality Vary compression based on image importance:
- Hero images: 85% quality
- Secondary images: 75% quality
- Background images: 65% quality
2. Responsive Image Optimization Generate multiple sizes:
original.jpg (2000px) → 150 KB
medium.jpg (1200px) → 80 KB
small.jpg (600px) → 40 KB
thumbnail.jpg (300px) → 15 KB
3. Format Migration Strategy
- Migrate from PNG to WebP: 26% smaller
- Migrate from JPG to WebP: 25-35% smaller
- Migrate from JPG to AVIF: 50% smaller (limited browser support)
Real results: E-commerce sites using Pic Visual’s outsourced photo editing report average page load improvements of 2.3 seconds after implementing comprehensive image optimization.
4. Image to Video AI Free: Transform Static Images into Dynamic Content
The trend: Video content generates 1200% more shares than text and images combined (Wordstream, 2025). But video creation is time-consuming and requires specialized skills.
The solution: AI-powered image-to-video tools that automatically animate static images, create slideshows, and add motion effects.
Why Convert Images to Video?
Engagement benefits:
- Videos on landing pages increase conversions by 86%
- Social media videos get 48% more views than static images
- Video posts generate 3x more inbound links
- People retain 95% of a message when watching vs. 10% when reading
Common use cases:
- Social Media Content
- Instagram Reels and Stories
- TikTok videos
- LinkedIn video posts
- Facebook video ads
- Marketing Materials
- Product demonstrations
- Before/after showcases
- Testimonial compilations
- Brand story videos
- Presentations
- Animated slideshows
- Photo montages
- Event recaps
- Portfolio presentations
- E-Commerce
- 360° product views from multiple angles
- Lifestyle imagery sequences
- Size/fit demonstrations
- Seasonal collection showcases
Top Free Image-to-Video AI Tools (2026)
1. Runway Gen-2 (Free Tier)
- AI Capability: Text-to-video + image-to-video
- Style: Cinematic, realistic
- Free limit: 125 credits (≈5 videos)
- Output: Up to 4K resolution
- Best for: Creative, artistic videos
- Premium: $15/month
2. Pika Labs
- AI Capability: Image animation, video extension
- Style: Multiple artistic styles
- Free limit: 30 generations/month
- Features: Camera motion control, aspect ratio customization
- Best for: Quick social media content
- Premium: $10/month
3. Lumen5
- Platform: Web-based
- Type: Slideshow + stock footage automation
- Free limit: 5 videos/month (watermarked)
- Features: Auto-sync to music, text overlays, branding
- Best for: Blog post to video conversion
- Premium: $29/month
4. InVideo
- Platform: Web-based
- Templates: 5000+ professional templates
- Free limit: Unlimited (watermarked)
- Features: Text-to-video, multi-scene editing
- Best for: Marketing videos, presentations
- Premium: $25/month
5. Animoto
- Platform: Web-based
- Style: Professional slideshows
- Free limit: 10 minutes/month
- Features: Licensed music library, drag-and-drop
- Best for: Business presentations, event videos
- Premium: $16/month
6. Canva Video (formerly Canva Pro Video)
- Platform: Web-based (within Canva)
- Free limit: Unlimited basic features
- Features: Integrated with Canva design tools
- Best for: Quick social media videos
- Premium: $12.99/month
Image to Video Tutorial: Step-by-Step
Method 1: AI Animation (Pika Labs Example)
Step 1: Prepare Your Image
- Upload a single high-quality image
- Best results: clear subject, good composition
- Resolution: 1024×1024 or higher
Step 2: Add Motion Prompts
Example prompts:
- "Camera slowly zooms in on the subject"
- "Gentle pan from left to right"
- "Subject slowly turns to face camera"
- "Background slowly blurs, subject remains sharp"
- "Add subtle breathing motion to portrait"
Step 3: Configure Settings
- Duration: 3-4 seconds typical
- Motion intensity: Low/medium/high
- Camera movement: Pan, zoom, rotate, or combination
- Aspect ratio: 16:9 (landscape), 9:16 (vertical), 1:1 (square)
Step 4: Generate and Review
- Generation time: 30-120 seconds
- Preview before downloading
- Regenerate with adjusted prompts if needed
Step 5: Download
- Format: MP4 (H.264)
- Resolution: Up to 4K depending on source
- Share directly to social platforms
Method 2: Slideshow Creation (Lumen5 Example)
Step 1: Upload Multiple Images
- Recommended: 5-15 images
- Mix of wide shots, close-ups, and details
- Consistent style/color palette works best
Step 2: Choose Template
- Browse by category: Business, Social Media, Education, etc.
- Preview animations and transitions
- Select based on video tone (professional, playful, elegant)
Step 3: Customize Sequence
- Drag to reorder images
- Adjust duration per image (2-5 seconds typical)
- Add text overlays for key messages
- Include logo/branding elements
Step 4: Add Audio
- Select from royalty-free music library
- Upload custom audio (voiceover, branded music)
- Adjust volume levels
- Sync transitions to beat (auto-sync available)
Step 5: Finalize and Export
- Preview full video
- Adjust timing/transitions as needed
- Export in desired resolution
- Download or share directly
Advanced AI Video Techniques
1. Creating 360° Product Views Process:
1. Photograph product from 16-24 angles (every 15-22.5°)
2. Use AI upscaling to ensure consistent quality
3. Compile in video editor or 360° tool
4. Add rotation animation
5. Export as looping video
Impact: 360° views increase conversion rates by 27% (Shopify data)
2. Ken Burns Effect Automation The classic zoom-and-pan effect that brings still images to life:
- Tools: iMovie, Keynote, or dedicated AI tools
- Best for: Storytelling, documentary-style content
- Duration: 5-8 seconds per image for natural feel
3. Parallax Animation Creating depth by animating foreground and background at different speeds:
- Tools: After Effects, Runway ML
- Best for: Dynamic social media content
- Tip: Works best with images that have clear depth layers
4. AI-Generated Motion Latest AI models can:
- Animate clothing and hair realistically
- Add natural facial expressions to portraits
- Create water/cloud movement
- Simulate camera movement from single image
Pro tip: For high-volume video creation, Pic Visual’s fashion photo retouching services can prepare your images specifically for video conversion, ensuring consistency and optimal results.
Pic Visual: Your Complete Image Editing Solution
After exploring individual tools and techniques, it becomes clear that managing multiple platforms, subscriptions, and workflows is inefficient. This is where integrated solutions shine.
Why Choose an All-in-One Platform?
The fragmented workflow problem:
- Average marketer uses 7-12 different image tools monthly
- Context switching wastes 23 minutes per day (RescueTime study)
- Inconsistent results across different tools
- Multiple subscriptions costing $50-200/month combined
- File format conversion complications
- Learning curve for each platform
The integrated solution advantage:
- ✓ Single platform for all image needs
- ✓ Consistent quality and processing
- ✓ Unified pricing structure
- ✓ Centralized file management
- ✓ Batch processing across functions
- ✓ Professional support when needed
Pic Visual: Complete Feature Set
Pic Visual offers a comprehensive suite of services that covers the entire image editing spectrum:
Core AI Services
1. Background Removal
- Professional background removal service
- Batch processing capability
- Manual refinement options
- Multiple export formats
2. Ghost Mannequin Effects
- Complete ghost mannequin services for apparel brands
- Invisible mannequin techniques for natural product presentation
- Hollow man effect services for 3D garment visualization
- Dedicated ghost mannequin service for e-commerce
Why this matters: According to Pic Visual’s ghost mannequin photography guide, proper ghost mannequin photography can increase e-commerce conversions by 30-35% compared to traditional product photography.
Specialized Retouching Services
3. Fashion Photography
- Fashion photo retouching service
- Skin retouching and enhancement
- Color correction and grading
- Garment texture enhancement
- Maintaining natural look while achieving perfection
4. Jewelry Retouching
- High-end jewelry retouching services
- Advanced jewelry photo retouching
- Metal and gemstone enhancement
- Reflection and light optimization
- Detail preservation at microscopic levels
Industry benchmark: Luxury jewelry brands report 42% higher perceived value when products are photographed with professional retouching versus smartphone photography alone.
5. Editorial Retouching
- Editorial retouching services for publications
- Magazine-quality finishing
- Maintaining authenticity while enhancing appeal
- Industry-standard color profiles
Advanced Capabilities
6. 3D Modeling & Visualization
- Advanced 3D modeling services
- Product visualization from photos
- 360° rotation creation
- AR-ready model creation
7. Trend-Aligned Services Pic Visual stays current with industry developments:
- Implementation of 2026 product photography trends
- Sustainable fashion imaging aligned with recycled fashion principles
- Modern e-commerce standards
How Pic Visual Solves Real Business Challenges
Challenge 1: Inconsistent Product Photography Solution: Standardized editing processes ensure every product image meets the same quality standard, creating cohesive brand presentation.
Results: Fashion retailers report 28% reduction in customer service inquiries about product appearance after implementing consistent professional retouching.
Challenge 2: Time-Consuming Manual Editing Solution: AI-powered automation handles 80% of routine tasks, with human experts available for complex work.
Results: According to Pic Visual’s outsourcing guide, businesses save average 15-20 hours per week by outsourcing image editing.
Challenge 3: Scaling Image Production Solution: Batch processing and dedicated team capacity allow handling hundreds of images daily without quality compromise.
Results: E-commerce brands successfully launch seasonal collections 40% faster with outsourced editing support.
Challenge 4: Maintaining Brand Consistency Solution: Custom style guides and dedicated editors ensure consistent look across all imagery.
Results: 93% brand recognition improvement when using consistent professional image editing (Adobe Brand Study, 2025).
Pricing Philosophy: Professional Results, Accessible Pricing
While specific pricing varies by project scope, Pic Visual operates on these principles:
Transparent Pricing
- Clear per-image or project-based quotes
- No hidden fees
- Volume discounts available
- Custom packages for agencies and large brands
Value Comparison
| Solution | Monthly Cost | Quality | Time Investment |
|---|---|---|---|
| DIY + Free Tools | $0 | Variable | 20-40 hours |
| Multiple Subscriptions | $50-200 | Inconsistent | 15-25 hours |
| Freelance Editors | $300-800 | Variable | 10-15 hours (management) |
| Pic Visual | Starting $199 | Consistent Professional | 2-5 hours (review only) |
ROI calculation: If your time is worth $50/hour, saving 20 hours monthly = $1,000 value. Pic Visual pays for itself while delivering superior results.
Getting Started with Pic Visual
Step 1: Define Your Needs Determine which services align with your goals:
- E-commerce product photography
- Fashion/apparel imaging
- Jewelry product shots
- Editorial content
- Marketing materials
Step 2: Submit Sample Project
- Upload 5-10 sample images
- Describe desired outcome
- Receive custom quote and timeline
- Review sample edits before committing
Step 3: Establish Workflow
- Define style guidelines
- Set quality standards
- Agree on turnaround times
- Establish communication channels
Step 4: Scale as Needed
- Start with small batch (25-50 images)
- Refine processes based on results
- Increase volume when confident
- Access dedicated support team
Visit Pic Visual to explore services and request a custom quote for your specific needs.
Tips for Professional-Quality Results Across All Methods
Regardless of which background removal method or image editing tool you choose, these universal principles ensure maximum quality:
1. Start with High-Quality Source Images
The foundation rule: No amount of editing can compensate for poor source material.
Photography best practices:
- Lighting: Use even, diffused lighting to minimize harsh shadows
- Focus: Ensure subject is sharp—AI struggles with blurry edges
- Resolution: Capture at highest resolution possible (minimum 2000×2000px for products)
- Background contrast: When possible, photograph against contrasting backgrounds
- Camera settings: Shoot in RAW format for maximum editing flexibility
Impact data: High-quality source images reduce editing time by 60% and improve AI accuracy by 35% (Adobe AI Research, 2025).
2. Master Edge Refinement Techniques
The challenge: Edges make or break background removal quality, especially with:
- Hair and fur
- Transparent or semi-transparent objects
- Fine details (jewelry chains, feathers)
- Complex shapes (foliage, intricate products)
Edge refinement strategies:
For Hair and Fur:
Photoshop:
1. Use "Select and Mask" workspace
2. Enable "Edge Detection"
3. Set radius to 5-20px depending on hair complexity
4. Use "Refine Edge Brush" along hair boundary
5. Adjust "Shift Edge" slider (-50% to +50%)
6. Enable "Decontaminate Colors" to remove color fringing
For Transparent Objects:
- Manually trace with Pen Tool for precision
- Use layer masks with reduced opacity for semi-transparency
- Consider photographing against black AND white backgrounds for compositing
For Complex Edges:
- Zoom to 200-400% when refining
- Use combination of automated selection + manual cleanup
- Accept that some areas may require complete manual masking
- Build custom brushes for repetitive edge patterns
3. Handle Common Artifacts and Imperfections
Fringing (color halos):
- Cause: Background color bleeding into edges
- Fix: “Decontaminate Colors” in Photoshop
- Prevention: Shoot against neutral gray backgrounds
Jagged edges:
- Cause: Insufficient feathering
- Fix: Apply 0.5-2px feather to selection
- Prevention: Use higher resolution source images
Lost detail:
- Cause: Over-aggressive AI removal
- Fix: Manually restore using history brush or layer masks
- Prevention: Use “preserve details” settings when available
Inconsistent edges:
- Cause: Varying lighting or focus
- Fix: Manually even out with soft brush at low opacity
- Prevention: Ensure consistent lighting during photography
4. Choose Optimal Output Formats
Understanding file formats prevents quality loss and ensures compatibility:
| Format | Transparency | Compression | Best Use Case | File Size |
|---|---|---|---|---|
| PNG | Yes | Lossless | Web graphics, logos, transparent images | Large |
| JPG | No | Lossy | Photographs, web images with solid backgrounds | Small |
| WebP | Yes | Both | Modern web optimization, all-purpose | Very Small |
| TIFF | Yes | Lossless | Print production, archival | Very Large |
| PSD | Yes | Lossless | Editing workflow, maintaining layers | Large |
| GIF | Yes | Lossless | Simple animations, very simple graphics | Small |
| AVIF | Yes | Lossy | Cutting-edge web optimization | Smallest |
Decision flowchart:
Need transparency?
├─ Yes: PNG or WebP
│   ├─ For web: WebP (fallback to PNG)
│   └─ For print: TIFF or PNG
└─ No: JPG or WebP
    ├─ For web: WebP (fallback to JPG)
    └─ For print: TIFF or high-quality JPG
Color space considerations:
- sRGB: Standard for web and digital displays
- Adobe RGB: Wider color gamut for professional print
- CMYK: Required for commercial printing
5. Workflow Optimization for Efficiency
Batch processing strategies:
For AI tools:
- Group similar images (same lighting, background type)
- Process entire batch with same settings
- Review results together
- Manual refinement only where needed
For Photoshop:
- Create Actions for repetitive steps
- Use Batch processing (File > Automate > Batch)
- Save frequently used selections as Channels
- Create layer styles for consistent effects
Time-saving keyboard shortcuts:
Photoshop essentials:
W– Quick Selection ToolCtrl/Cmd + J– Duplicate layerCtrl/Cmd + Shift + I– Invert selectionQ– Toggle Quick Mask modeX– Swap foreground/background colorsCtrl/Cmd + D– DeselectShift + F5– Content-Aware Fill dialog
Organization best practices:
Project folder structure:
/project-name
  /01-originals (never edit these)
  /02-working (PSD files with layers)
  /03-finals (exported deliverables)
  /04-web-optimized (compressed versions)
  /style-guide.pdf (reference document)
6. Quality Control Checklist
Before finalizing any image, check:
Technical quality:
- [ ] No visible edge artifacts or fringing
- [ ] Appropriate resolution for intended use
- [ ] Correct color space (sRGB for web, CMYK for print)
- [ ] File size optimized for use case
- [ ] Transparency working correctly (check against different backgrounds)
Visual quality:
- [ ] Subject properly isolated
- [ ] Natural-looking edges
- [ ] Consistent lighting (if compositing)
- [ ] No unintended content removed
- [ ] No compression artifacts
- [ ] Colors accurate to original
Functional quality:
- [ ] Correct file naming convention
- [ ] Proper format for intended use
- [ ] Metadata intact (if needed)
- [ ] Backup of original file maintained
Professional standard: Zoom to 100% on target display size. If imperfections are visible at actual viewing size, refinement is needed.
Best Practices for Different Use Cases
Different applications require different approaches. Here’s how to optimize for specific scenarios:
E-Commerce Product Photography
Requirements:
- Consistent white or neutral backgrounds
- Accurate color representation
- Sharp detail throughout
- Multiple angle consistency
- Fast page load (optimized file size)
Recommended workflow:
- Use Pic Visual’s background removal or batch AI tool
- Apply consistent white balance across all products
- Ensure uniform lighting appearance
- Compress to 100-200KB per image (WebP preferred)
- Generate multiple sizes for responsive display
Quality benchmarks:
- Resolution: 2000×2000px minimum (for zoom functionality)
- File size: 100-200KB after compression
- Format: WebP with JPG fallback
- Background: Pure white (#FFFFFF) or transparent
Success metric: Pic Visual’s e-commerce research shows properly optimized product images increase “add to cart” rates by 24-32%.
Social Media Content
Platform-specific requirements:
Instagram:
- Square: 1080×1080px (posts)
- Vertical: 1080×1920px (stories, reels)
- Horizontal: 1080×566px (landscape posts)
- File size: Under 30MB
- Aspect ratios: 1:1, 4:5, 9:16
Facebook:
- Recommended: 1200×630px (shared links)
- Square: 1080×1080px (posts)
- File size: Under 8MB
- Format: JPG or PNG
LinkedIn:
- Recommended: 1200×627px (shared content)
- Personal: 400×400px (profile photo)
- File size: Under 10MB
TikTok:
- Vertical: 1080×1920px
- File size: Under 287MB (video), 5MB (images)
- Format: MP4 for video
Twitter/X:
- Recommended: 1200×675px
- Aspect ratio: 16:9 or 1:1
- File size: Under 5MB
- Format: JPG, PNG, GIF
Optimization strategy:
- Create background-removed master files
- Export variations for each platform
- Add platform-specific backgrounds/branding
- Compress aggressively (social platforms re-compress anyway)
- Test preview appearance before posting
Marketing Materials & Print
Print requirements differ drastically from digital:
Resolution: 300 DPI minimum at final print size
- Example: 4×6 photo = 1200×1800 pixels minimum
- Example: 24×36 poster = 7200×10800 pixels minimum
Color mode: CMYK (not RGB)
- Convert in Photoshop: Image > Mode > CMYK Color
- Note: Colors will shift slightly from screen appearance
Bleed requirements: Extend background 0.125″ beyond trim line
- Prevents white edges if cutting is slightly off
- Critical for professional print projects
File format: High-quality PDF or TIFF
- PDF preserves vectors and fonts
- TIFF for maximum quality raster images
Workflow:
- Edit at higher resolution than needed
- Convert to CMYK color space
- Add bleed if required
- Save uncompressed TIFF or PDF/X-4
- Send proof for print shop approval
Professional Presentations
Requirements:
- Consistency across all slides
- Optimized for projector display (1920×1080)
- Fast load times
- Professional aesthetic
Best practices:
- Remove all backgrounds for consistent look
- Use transparent PNGs throughout
- Apply consistent drop shadows for depth
- Limit to 2-3 image styles per presentation
- Compress images to 100-150KB each
Template approach:
- Create master slide with background
- Insert product/subject as PNG overlay
- Duplicate slide for consistency
- Batch process all images with same settings
Portfolio & Showcase Work
Requirements:
- Maximum visual impact
- Demonstrate technical skill
- Fast web loading
- Professional presentation
Recommended approach:
- Keep highest quality originals archived
- Create web-optimized versions (1920×1080 max)
- Use lightbox/gallery viewer for larger views
- Include before/after comparisons when relevant
- Maintain aspect ratios for professional appearance
Format strategy:
- Hero images: High quality JPG (85-90%), 400-600KB
- Thumbnails: Aggressive compression, 50-100KB
- Detail shots: Medium quality, 200-300KB
- Format: WebP with JPG fallback for compatibility
Frequently Asked Questions (FAQ)
Can I remove backgrounds from images completely free?
Yes, several options exist for free background removal:
- Free online tools with limitations:
- Remove.bg: 50 images/month free
- Canva: 10 images/month free
- PhotoRoom: Unlimited with watermark
- Open-source software:
- GIMP: 100% free forever
- Krita: Free with background removal capabilities
- Free tiers of premium tools:
- Adobe Express: Free account allows background removal
- Pixlr: Basic background removal available free
Limitations to consider:
- Lower resolution outputs (often 640×960px in free tiers)
- Watermarks on results
- Monthly usage caps
- Less precise results on complex images
- No batch processing
For professional or high-volume use, paid tools or services like Pic Visual offer better value through higher quality, faster processing, and bulk capabilities.
What’s the best file format for transparent backgrounds?
PNG (Portable Network Graphics) is the standard format for transparent backgrounds because:
✓ Supports full alpha channel transparency ✓ Lossless compression preserves quality ✓ Universal browser and software support ✓ No quality degradation on re-saving
Alternative formats:
WebP (Modern, recommended for web):
- 26% smaller file size than PNG
- Supports transparency
- Excellent browser support (95%+ as of 2026)
- Best choice: Use WebP with PNG fallback
TIFF (Print and professional):
- Supports transparency
- Lossless quality
- Large file sizes
- Best for print production
GIF (Legacy, avoid):
- Supports transparency
- Limited to 256 colors
- Visible quality loss
- Only use for simple graphics/animations
Avoid: JPG does not support transparency and will add white background when saved.
How do I remove watermarks legally and ethically?
Important disclaimer: Only remove watermarks from:
- Images you own or created
- Stock photos you’ve purchased/licensed
- Content where you have explicit written permission
Legal methods:
For your own watermarked content:
- Locate original unwatermarked file
- Re-export from source software
- Use layered PSD files if available
For licensed stock photos:
- Purchase the license (prices typically $5-50)
- Download the unwatermarked version provided
- Sites: Adobe Stock, Shutterstock, iStock
For content you have permission to use:
- Request unwatermarked version from owner
- Get written permission to modify
- Credit original creator appropriately
Illegal and unethical: ✗ Removing watermarks from preview images to avoid paying ✗ Removing watermarks from others’ copyrighted work ✗ Using watermark removal tools to bypass licensing
Consequences: Copyright infringement can result in:
- $750-$30,000 per image in statutory damages
- Legal fees and court costs
- Permanent injunctions
- Criminal penalties in severe cases
Free legal alternatives:
- Unsplash: 3M+ free, unwatermarked images
- Pexels: 3.2M+ free photos and videos
- Pixabay: 2.7M+ free images
- Pic Visual’s own stock resources (when available)
What’s the difference between image compression and resizing?
These are fundamentally different operations:
Image Compression = Reducing file size while keeping pixel dimensions the same
How it works:
- Removes redundant data
- Reduces color depth
- Simplifies complex areas
- Uses mathematical encoding
Result: Same dimensions, smaller file size Example: 2000×2000px image goes from 5MB to 500KB
When to use:
- Optimizing for web loading speed
- Reducing storage requirements
- Email attachments
- Meeting upload size limits
Image Resizing = Changing pixel dimensions (width and height)
How it works:
- Resamples pixel information
- Upscaling: Interpolates to add pixels
- Downscaling: Removes pixels strategically
Result: Different dimensions, proportionally different file size Example: 4000×4000px image becomes 1000×1000px
When to use:
- Fitting specific display requirements
- Creating thumbnails
- Reducing resolution for specific platforms
- Preparing for print at different sizes
Best practice: Often use both together:
- Resize to appropriate dimensions for use case
- Then compress to optimize file size
- Example: 4000×4000 (10MB) → Resize → 2000×2000 (2.5MB) → Compress → 2000×2000 (400KB)
Can AI image enlargers really improve quality?
Yes, with limitations. Modern AI enlargers (also called “super-resolution” models) genuinely enhance image quality through machine learning, not just pixel stretching.
What AI enlargers CAN do: ✓ Intelligently add detail based on learned patterns ✓ Sharpen blurry edges effectively ✓ Reduce noise while enlarging ✓ Reconstruct textures realistically ✓ Maintain quality up to 4x enlargement
What they CANNOT do: ✗ Create detail that never existed ✗ Fix severely out-of-focus images ✗ Perfectly reconstruct text from very low resolution ✗ Match the quality of originally captured high-res images ✗ Work miracles on extremely degraded sources (<200px)
Quality expectations by enlargement factor:
| Factor | Input → Output | Quality Retention | Use Case |
|---|---|---|---|
| 2x | 1000px → 2000px | 90-95% | Excellent results |
| 4x | 1000px → 4000px | 80-85% | Good results |
| 8x | 1000px → 8000px | 65-75% | Acceptable for some uses |
| 16x | 1000px → 16000px | 40-60% | Experimental only |
Real-world testing (2026 benchmark):
- Starting resolution: 512×512px photograph
- Enlarged to: 2048×2048px (4x)
- Best AI tool (Gigapixel AI): 83% perceived quality
- Traditional bicubic: 45% perceived quality
- Improvement: 38% better quality
Bottom line: AI enlargement is genuinely effective for 2-4x enlargement from reasonably good sources. For critical professional work, always start with the highest resolution possible rather than relying on enlargement.
Should I use mobile apps or desktop software for background removal?
The answer depends on your specific needs:
Choose mobile apps when: ✓ Editing 1-5 images at a time ✓ Creating social media content ✓ Working on-the-go ✓ Speed is priority over perfection ✓ Images are simple (clear subject, uncomplicated background) ✓ Immediate posting to social platforms
Best mobile scenarios:
- Instagram content creation
- Quick product shots for social
- Personal profile pictures
- Casual photography projects
Choose desktop software when: ✓ Handling complex images (hair, fur, transparency) ✓ Batch processing 10+ images ✓ Professional/commercial projects ✓ Pixel-perfect precision required ✓ Working with high-resolution images (4K+) ✓ Need advanced editing capabilities
Best desktop scenarios:
- E-commerce product catalogs
- Professional photography
- Print materials
- Marketing campaigns
- Portfolio work
The hybrid approach (recommended):
- Mobile for quick social posts and immediate needs
- Desktop for important/complex projects
- Professional service (Pic Visual) for high-volume or critical work
Cost-benefit analysis:
- DIY mobile: $0-10/month, 2-5 hours/week time investment
- DIY desktop: $0-30/month, 1-3 hours/week time investment
- Professional service: $199+/month, 15-30 minutes/week review time
How do I handle hair and fur in background removal?
Hair and fur represent the most challenging aspects of background removal due to fine, semi-transparent strands. Here’s the professional approach:
Method 1: Photoshop’s Select and Mask (Recommended)
Step-by-step process:
1. Make initial selection (Quick Selection Tool)
2. Click "Select and Mask" in options bar
3. Enable "Smart Radius" in Edge Detection
4. Set Radius to 10-30px (adjust based on hair complexity)
5. Use Refine Edge Brush (R) along hair boundary
6. Adjust "Shift Edge" slider:
   - Negative values (-30 to -50%): Contract selection
   - Positive values (+10 to +30%): Expand selection
7. Enable "Decontaminate Colors" (80-100%)
8. Output: New Layer with Layer Mask
9. Review on different backgrounds
10. Manual touch-up with soft brush if needed
Settings that matter most:
- Smart Radius: Essential for varying edge softness
- Decontaminate Colors: Removes background color fringing
- Feather: Keep low (0.3-0.8px) for natural edges
- Contrast: Increase slightly (5-15%) for definition
Method 2: Dedicated Hair Masking Plugins
Topaz Mask AI:
- Specialized in hair/fur isolation
- AI-trained specifically on edge cases
- One-click initial mask, then refine
- $99 one-time cost
Process:
- Apply Mask AI to image
- AI automatically detects hair/fur edges
- Review and adjust mask strength
- Export mask to Photoshop for final compositing
Method 3: Professional Photography Technique (Prevention)
Best approach: Photograph correctly from the start:
Lighting setup for hair:
- Backlight/rim light behind subject
- Separates hair from background
- Creates natural highlight on hair strands
- Makes edge detection significantly easier
Background choice:
- Contrasting color to hair (dark hair = light background)
- Avoid colors that match skin tones
- Gray or green work well for most situations
Example: Photographing with proper backlighting can reduce post-processing time for hair from 30 minutes to 5 minutes.
Common mistakes to avoid: ✗ Over-feathering edges (looks unnatural) ✗ Not checking against multiple background colors ✗ Removing too much hair detail ✗ Ignoring color fringing ✗ Using same technique for fine vs. thick hair
Pro tip: For critical commercial work requiring perfect hair isolation, Pic Visual’s editorial retouching services provide hand-crafted perfection that exceeds AI capabilities.
Conclusion: Your Path to Professional Image Editing
We’ve covered a comprehensive range of image editing capabilities—from basic background removal to advanced AI-powered enhancements. Here’s how to move forward based on your needs:
For Beginners & Casual Users
Start here:
- Try free AI background removers (Remove.bg, Canva)
- Experiment with mobile apps for social media
- Use free compression tools (TinyPNG, Squoosh)
- Learn one method well before expanding
Investment: $0-10/month Time commitment: 2-5 hours learning, then 15-30 minutes per project
For Small Business Owners & E-Commerce
Recommended approach:
- Use Pic Visual’s background removal service for product consistency
- Implement ghost mannequin techniques for apparel
- Batch process all images for uniformity
- Follow 2026 product photography trends
Investment: $199-800/month depending on volume Time saved: 15-25 hours monthly ROI: 24-35% conversion increase on average
For Professional Photographers & Designers
Professional toolkit:
- Master Photoshop’s advanced selection tools
- Invest in AI plugins (Topaz, Gigapixel)
- Develop efficient batch processing workflows
- Outsource high-volume projects to maintain creative focus
Consider Pic Visual’s fashion retouching or jewelry retouching services for client projects where perfection is non-negotiable.
For Agencies & Large Brands
Enterprise solution:
- Establish partnership with professional editing service
- Develop comprehensive style guides
- Implement quality control workflows
- Track conversion metrics to measure ROI
Learn more about outsourcing e-commerce photo editing to scale your operations efficiently.
Key Takeaways to Remember
Quality fundamentals:
- Source matters most – High-quality originals yield better results
- Right tool for the job – Match method to image complexity
- Edge refinement is what separates amateur from professional
- File formats matter – PNG for transparency, WebP for web optimization
- Compression is essential – Optimize every image for its destination
Efficiency principles:
- Batch process whenever possible
- Create templates and actions for repetitive tasks
- Outsource strategically when time is more valuable than cost
- Invest in learning – Skills compound over time
- Stay updated – AI tools improve constantly
Business impact:
- Professional image editing increases conversions 24-40%
- Consistent visual quality builds brand trust
- Optimized images improve site speed and SEO
- Time saved through efficiency enables business growth
Take Action Today
Ready to transform your images from amateur to professional?
Free resources to start:
- Test Pic Visual’s services with a sample project
- Read the complete ghost mannequin photography guide
- Explore current product photography trends
- Download free trials of recommended software
Next steps for serious results:
- Audit your current image quality and identify improvement areas
- Calculate time spent on manual editing vs. potential outsourcing ROI
- Test different methods on the same image to compare results
- Establish quality standards and workflows for consistency
Remember: Every professional-looking image you see online has been edited. The difference between mediocre and exceptional isn’t talent alone—it’s knowing the right tools and techniques, then applying them consistently.
Your journey to creating images that actually sell starts with a single background removal. Start today.
Related Resources:
- Background Removal Service – Pic Visual
- Ghost Mannequin Services – Pic Visual
- Fashion Photo Retouching – Pic Visual
- How to Outsource Photo Editing – Complete Guide
About Pic Visual
Pic Visual is a professional image editing service specializing in e-commerce, fashion, and product photography enhancement. With expertise spanning background removal, ghost mannequin effects, jewelry retouching, and comprehensive photo editing solutions, Pic Visual helps businesses and creators produce stunning visual content that drives results.
Visit www.picvisual.com to explore services or request a custom quote.
Last updated: February 2026 | Word count: 11,847 | Reading time: 47 minutes

