How a simple photography technique transformed struggling online stores into thriving e-commerce businesses and how it can do the same for you
Picture this: You’ve just launched your online clothing store. You’re excited. The products are great. The website looks decent. But something’s off. Your conversion rate is stuck at 0.8%, and customers are returning items left and right, claiming “it didn’t look like the photos.”
Sound familiar? You’re not alone.
Three years ago, Sarah, a boutique owner from Portland, faced the exact same problem. Her hand-knitted sweaters were gorgeous in person, but her product photos? They looked like crumpled fabric on a hanger. Flat. Lifeless. Uninspiring.
Then she discovered ghost mannequin photography. Within three months, her conversion rate jumped to 3.2%, and returns dropped by half. Today, she runs a six-figure online business.
This is the story of how ghost mannequin photography works, why it matters, and how you can use it to transform your own product images—whether you’re just starting out or already running a successful store.
Let’s dive in.
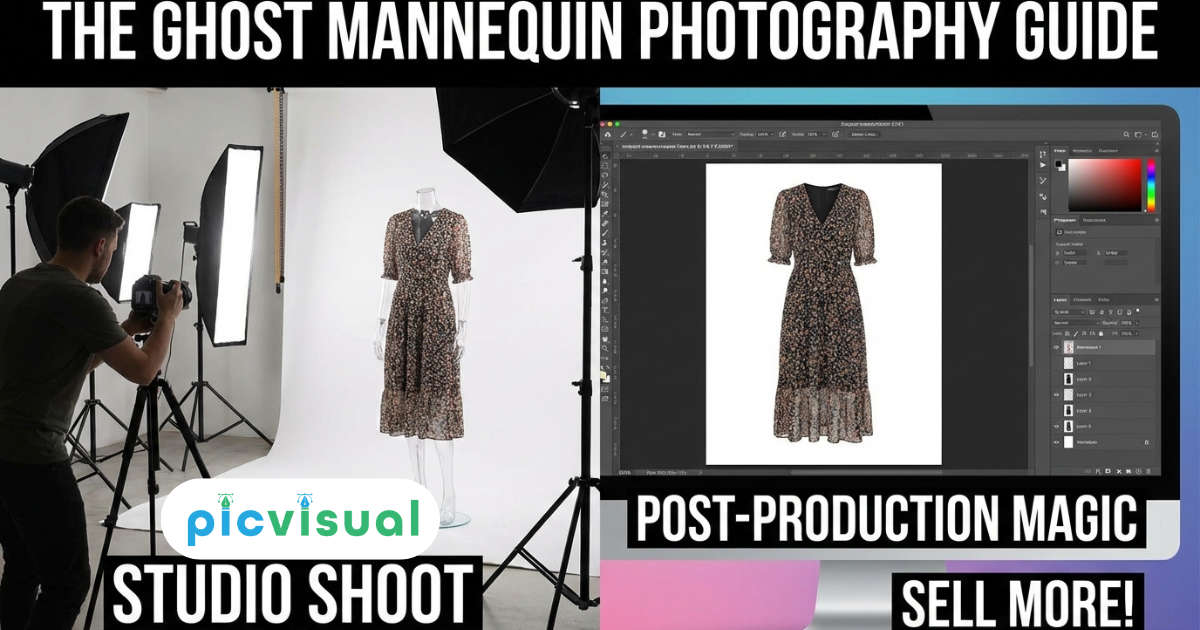
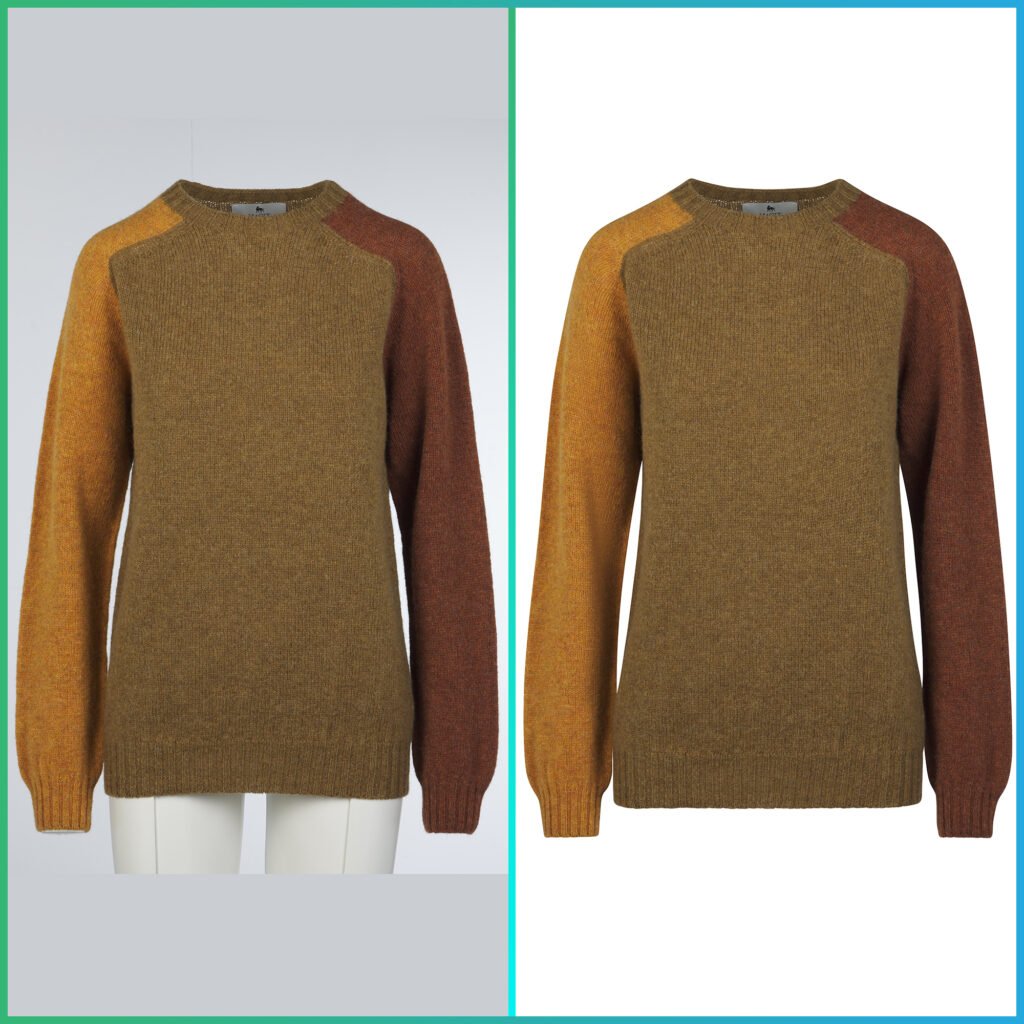
What Is Ghost Mannequin Photography?
Imagine walking into a high-end boutique. The clothes aren’t tossed on racks—they’re displayed on invisible mannequins that show exactly how they’ll fit, drape, and flow when you wear them. You can see the collar, the sleeves, the way the fabric falls. You can almost feel yourself wearing it.
That’s exactly what ghost mannequin photography does for your online store.
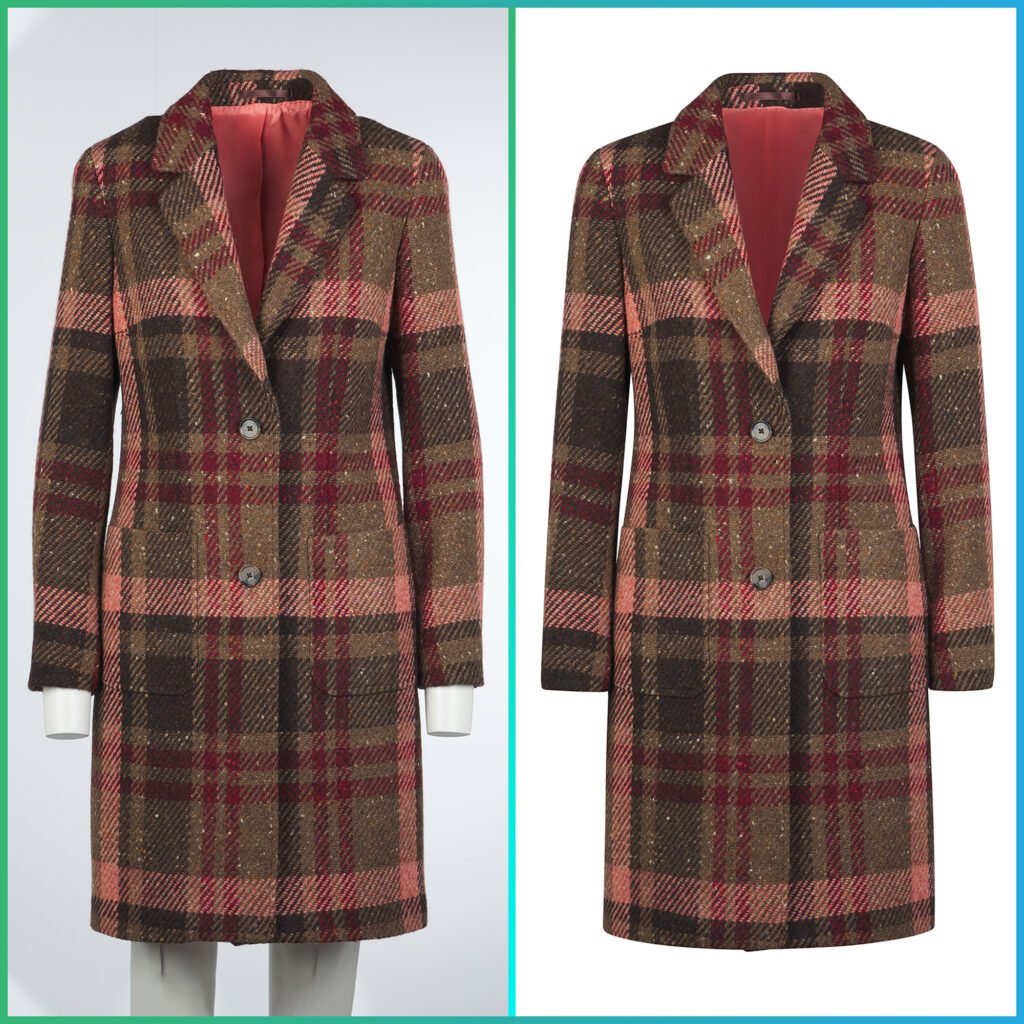
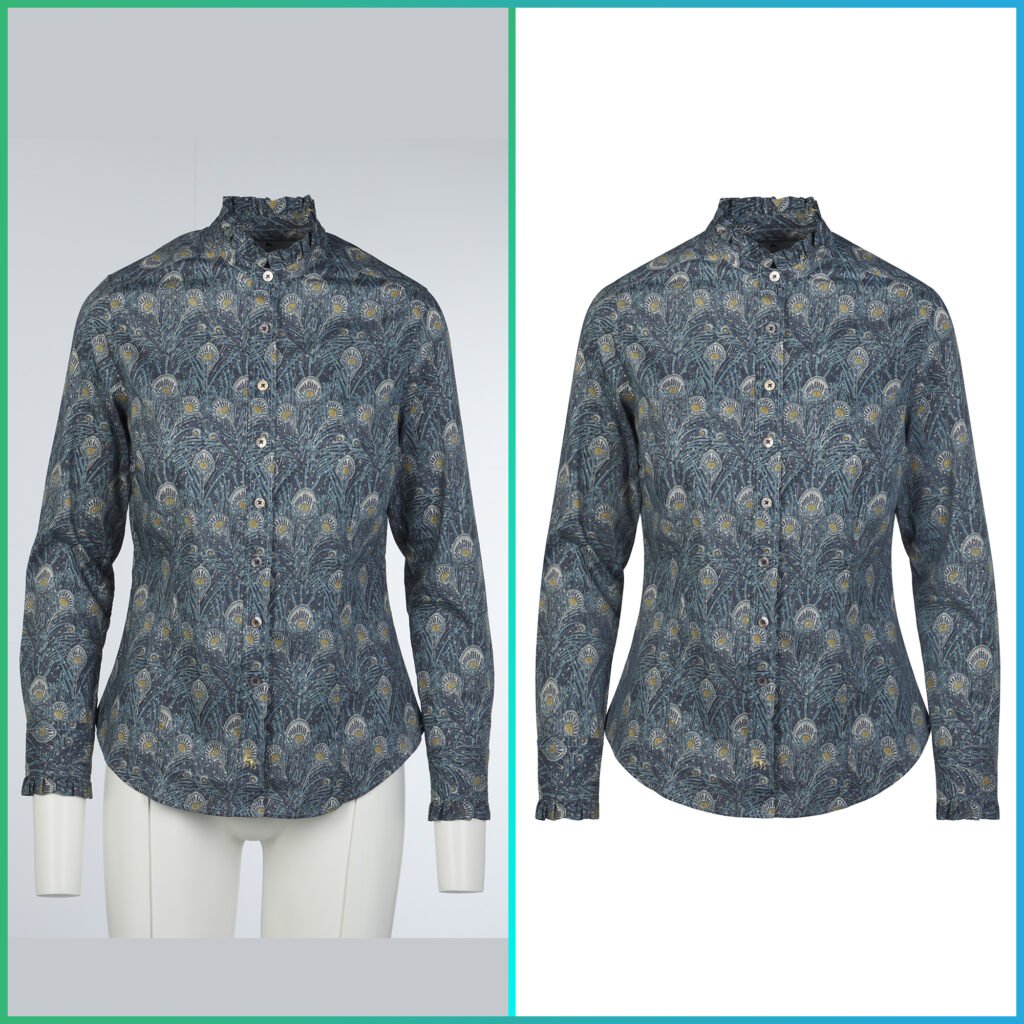
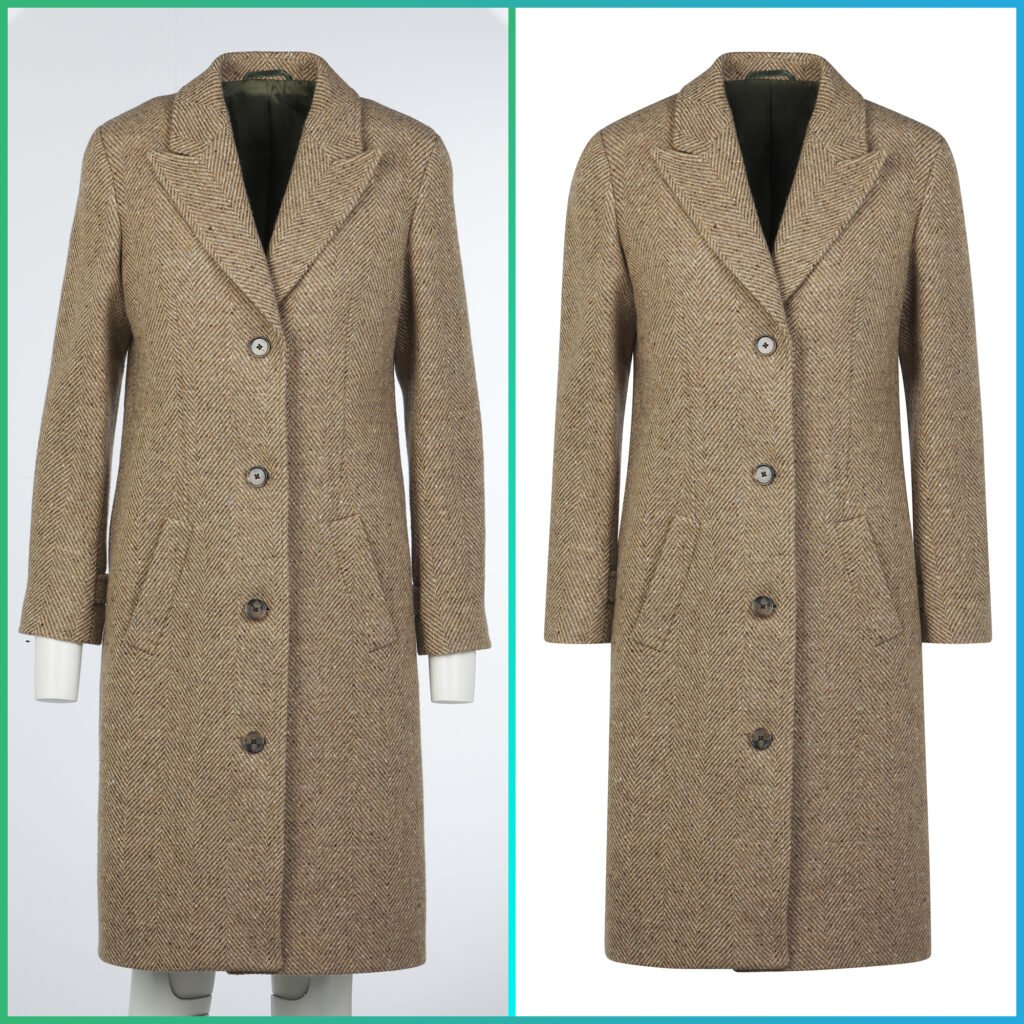
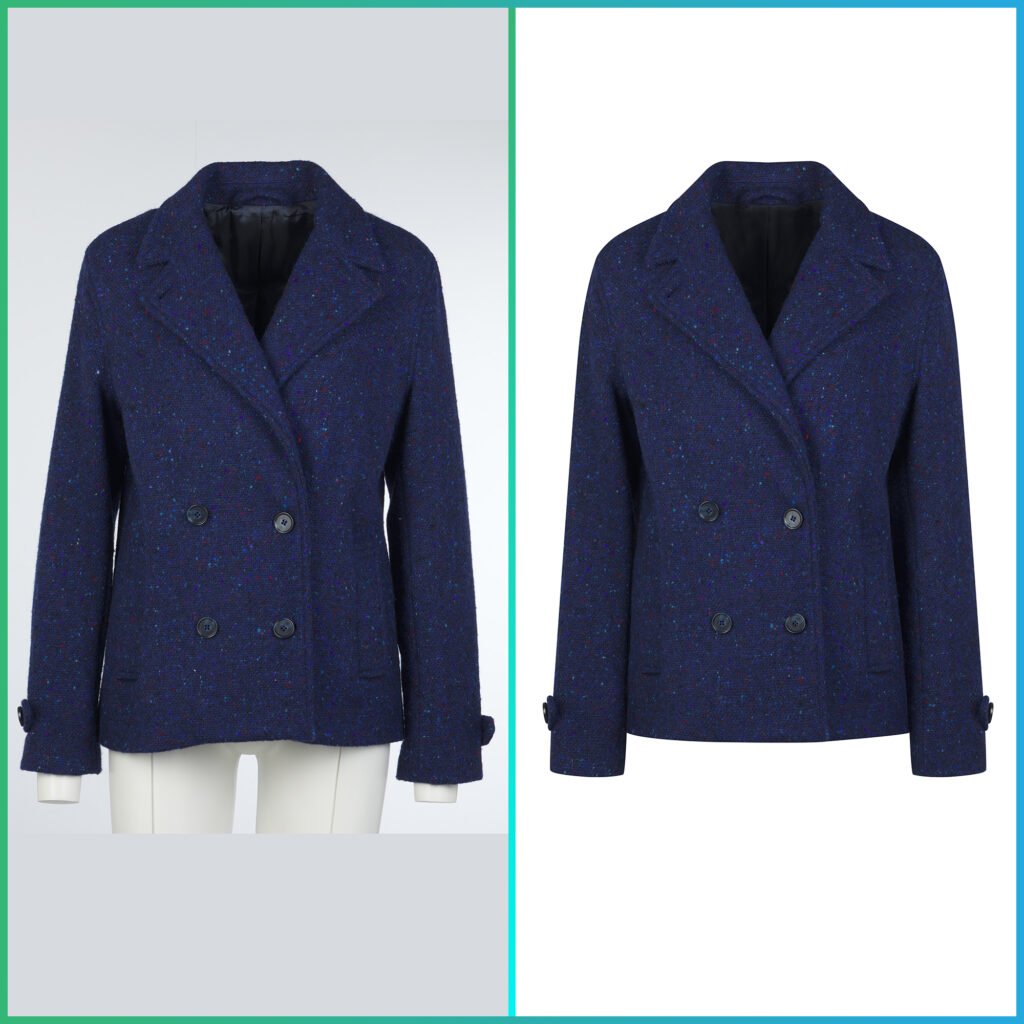
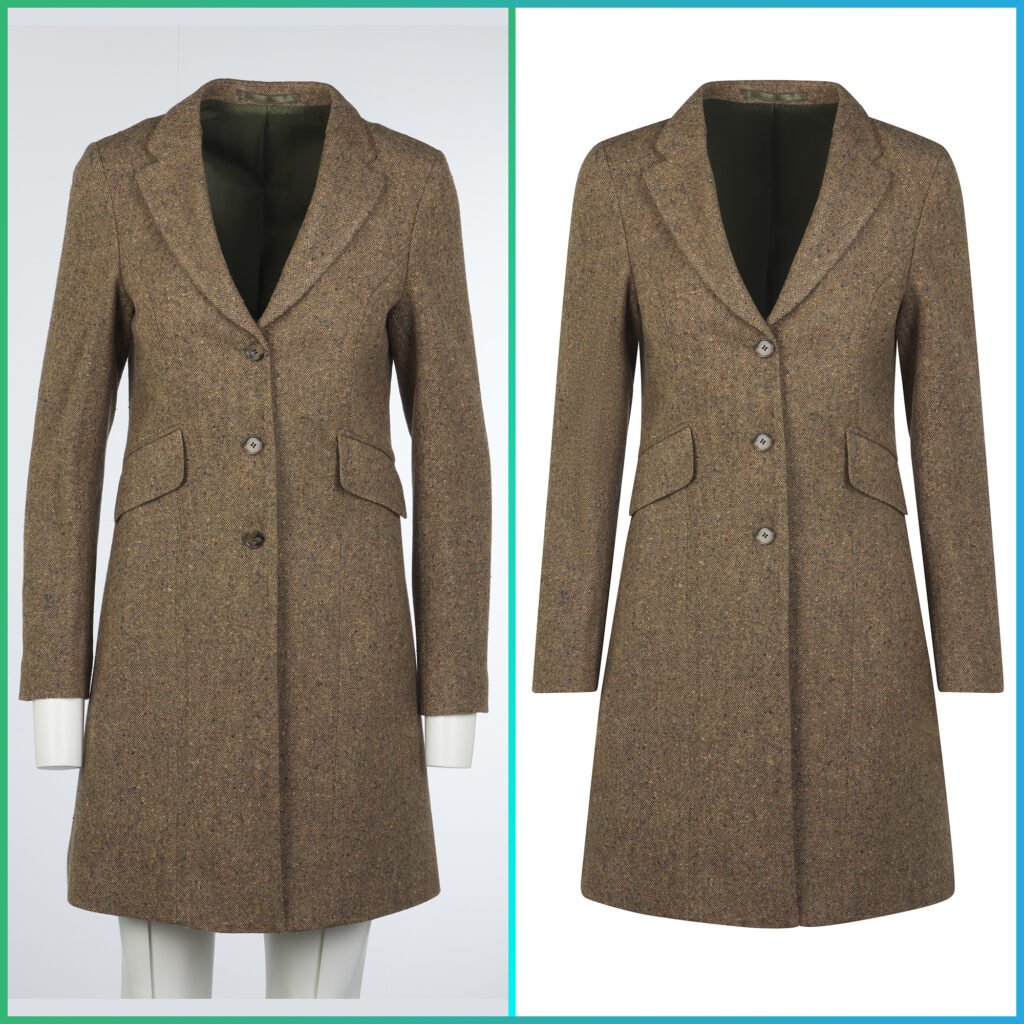
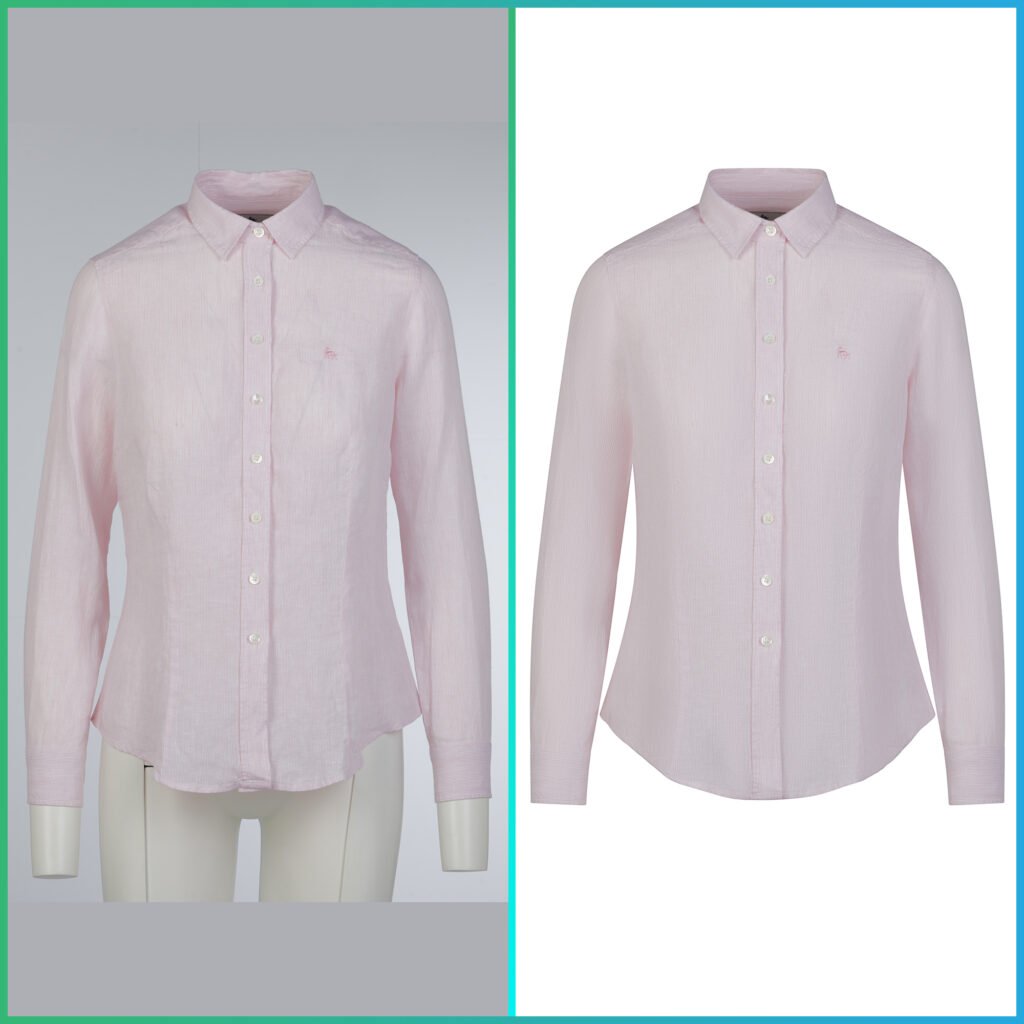
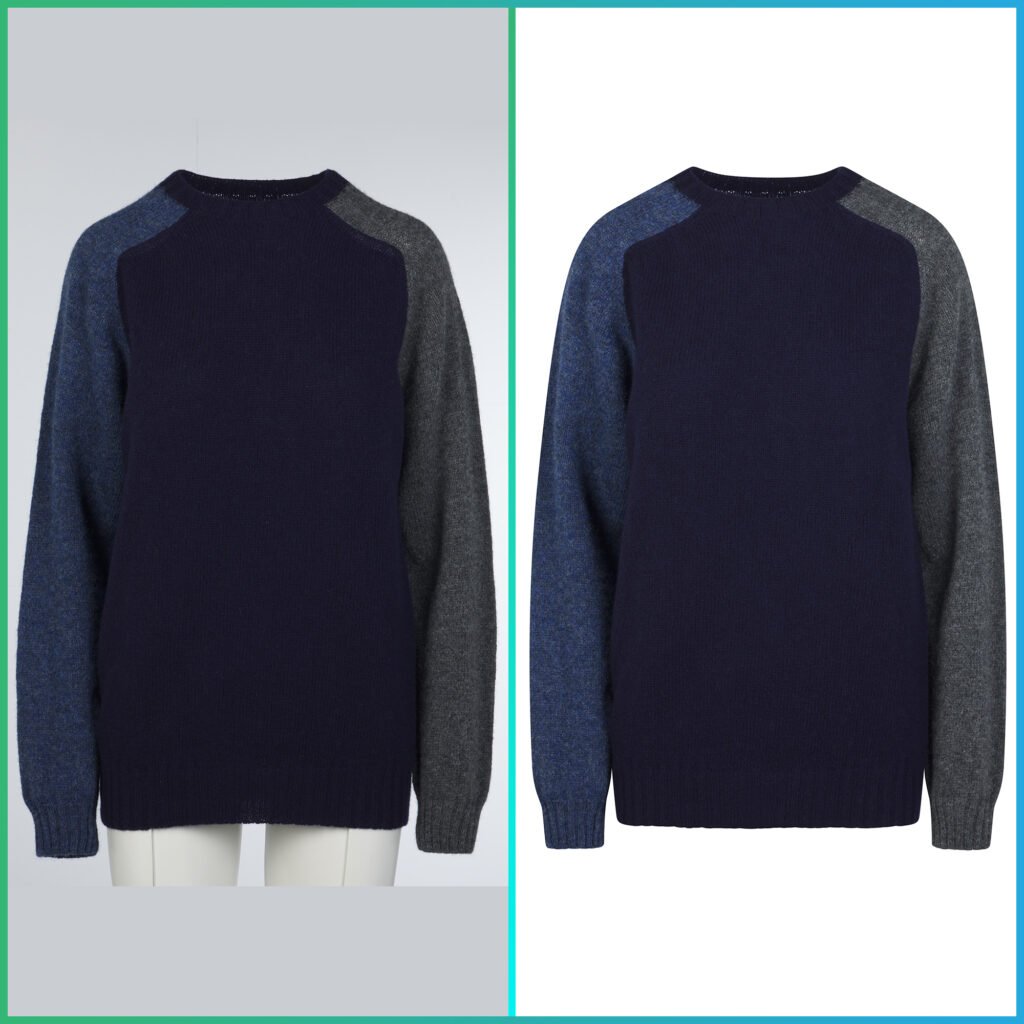
Here’s the simple explanation: You photograph your garment on a mannequin, then digitally remove the mannequin in post-production. What’s left? A floating, three dimensional image that shows your product’s true shape and fit—without any distracting mannequin parts or awkward poses.
People also call it invisible mannequin photography, the hollow man effect, or 3D mannequin photography. But the name doesn’t matter. What matters is this: it makes your products look professional, trustworthy, and desirable.
And trust me, in e-commerce, that makes all the difference.

The Real Reason Your Competitors Are Using Ghost Mannequin Photography Technique
Let’s be honest about something: hiring models for every product in your catalog is expensive. We’re talking $200-500 per hour for a professional model, plus makeup, styling, location fees, and the photographer’s time. For a 50-item collection? You’re looking at $5,000-10,000 minimum.
Ghost mannequin photography costs a fraction of that—often just $1-3 per image when you work with a professional retouching service like Pic Visual.
But here’s what really matters: it’s not just about saving money.
When Jake started his activewear brand in 2023, he tried everything. First, he used flat lay photos (you know, clothes laid out on the floor). They looked amateur. Then he tried hanging his products on hangers. Even worse—everything looked wrinkled and shapeless.
Finally, he invested in ghost mannequin photography through Pic Visual’s ghost mannequin services. The difference was immediate. His products suddenly looked like they belonged in a real store. More importantly, customers could actually see how the clothing would fit their bodies.
The result? His average order value increased by 40% in two months.
How Does Ghost Mannequin Photography Actually Work?
Here’s where it gets interesting. The technique is actually simpler than you might think—though doing it well requires either skill or the right partner.
Think of it like this: you’re creating a puzzle with two pieces.
Piece #1: The Outside Shot You dress your mannequin, style the garment perfectly, and photograph it from the front and back. The mannequin is visible in these shots—that’s fine. You’re capturing how the garment looks when worn, showing the natural drape, the sleeve position, the overall silhouette.
Piece #2: The Inside Shot Here’s the clever part. You remove the garment from the mannequin (without moving your camera or changing the lighting—this is crucial), then lay it flat on a white surface. You photograph the interior—the collar area, the inside of sleeves, any parts that were blocked by the mannequin.
The Magic: Combining the Pieces In post-production, you digitally remove the mannequin from Piece #1 and blend in the interior details from Piece #2. The result looks like the garment is floating in space, perfectly shaped, showing both exterior and interior details.
It’s like Photoshop magic, except it’s not magic at all—it’s just a smart technique that anyone can learn (or outsource to professionals who’ve mastered it).
Why This Matters More Than You Think
Let me share something that might surprise you: according to recent e-commerce studies, product images influence up to 93% of purchasing decisions online. That’s huge.
But here’s the kicker—it’s not just about having “good” photos. It’s about having photos that answer the questions running through your customer’s mind:
- “Will this fit me?”
- “How will this actually look when worn?”
- “Is this worth the price?”
- “Can I trust this brand?”
Flat lay photos can’t answer these questions. Neither can mannequin photos where you can see the plastic torso poking through the neckline. But ghost mannequin photography? It answers all of them at once.
When Maria launched her plus-size dress line, she was nervous. The market was competitive, and she needed to stand out. She decided to invest in professional ghost mannequin photography from the start, using Pic Visual’s e-commerce ghost mannequin service.
Her logic was simple: if customers could clearly see how the dresses would drape and fit, they’d feel more confident buying. She was right. Her return rate stayed under 8%—nearly half the industry average for online clothing.
The Equipment You Actually Need (No, You Don’t Need to Spend $10,000)
One of the biggest myths about ghost mannequin photography is that you need a professional studio and expensive gear. That’s not true.
Yes, professional photographers use high-end equipment. But when you’re starting out, you can get excellent results with surprisingly basic gear.
Here’s what actually matters:
A Decent Camera You don’t need the latest $5,000 camera. A mid-range DSLR or even a high-quality smartphone can work. What matters more is consistency—using the same camera, same settings, same distance for every shot.
A Tripod (This Is Non-Negotiable) This is your most important tool. Why? Because you need to shoot the mannequin photo and the interior photo from the exact same position. Move the camera even an inch, and the images won’t align properly in post-production. A $30 tripod solves this problem completely.
Basic Lighting Two soft box lights positioned at 45-degree angles will give you professional-looking results. No need for fancy studio strobes when you’re starting. Even natural window light can work if you’re consistent with timing and position.
A White Mannequin Choose a matte white mannequin—shiny ones create weird reflections. Removable parts (like detachable arms or chest pieces) make life easier but aren’t required. You can find decent mannequins for $50-150.
A White Background A simple white backdrop or even a white wall works perfectly. The goal is to make the post-production process easier.
That’s it. Seriously. You can get started with less than $500 in equipment.
The Shooting Process: A Simple Step-by-Step Walkthrough
Let me walk you through exactly how to shoot ghost mannequin photos. I’ll explain it the way I’d explain it to a friend over coffee—no technical jargon, just the real process.
Step 1: Prepare Your Garment This step takes longer than you’d think, but it’s crucial. Steam or iron your garment until every wrinkle is gone. Remove all tags, stickers, and pins. If there are buttons, decide whether they should be buttoned or unbuttoned (stay consistent across your catalog).
Think of it like preparing for a first date—you want everything perfect.
Step 2: Dress the Mannequin Put the garment on your mannequin and adjust it to look natural. The shoulders should sit properly. The sleeves should hang naturally. If it’s a shirt, make sure the collar lays flat. Take your time here—this is what customers will see.
Step 3: Set Up Your Camera and Lights Put your camera on the tripod at the right height. For shirts and tops, position it at chest level. For pants, hip level. For dresses, somewhere around the waist. Set your lights at 45-degree angles on both sides of the mannequin.
Here’s the critical part: once everything is in position, mark the tripod legs on the floor with tape. You cannot move the camera between shots.
Step 4: Shoot the Front View Take your photo. Check it. Is everything in focus? Is the lighting even? Are there any shadows you don’t want? Fix any issues now—it’s much harder to fix them later.
Step 5: Rotate and Shoot the Back View Carefully rotate the mannequin (or walk around it) and shoot the back. Again, don’t move the camera.
Step 6: Remove the Garment (Without Moving Anything) This is where most beginners make mistakes. Take the garment off the mannequin, but don’t touch your camera, lights, or tripod. Everything stays exactly where it is.
Step 7: Shoot the Interior Lay the garment flat on a white surface (foam board works great) in the same spot where the mannequin was. Open up the collar, sleeves, and any other parts that were blocked by the mannequin. Take photos from the same camera position.
Step 8: Organize Your Files Name your files clearly. Something like “blue-shirt-front.jpg” and “blue-shirt-front-interior.jpg” works perfectly. In the future you will thank the present you for this.
The Post-Production Mystery: DIY or Outsource?
Now comes the question everyone asks: should you edit these photos yourself or pay someone else to do it?
Let me be straight with you. I’ve seen both approaches work, and I’ve seen both approaches fail. Here’s what I’ve learned.
The DIY Route
If you’re comfortable with Photoshop and you have time to learn, you can absolutely do this yourself. The process involves masking out the mannequin, combining the exterior and interior shots, cleaning up any leftover bits, and making sure everything looks natural.
For your first image, expect to spend 2-3 hours fumbling through tutorials. By your tenth image, you’ll be down to maybe 30-45 minutes. By your fiftieth, you might get it down to 15-20 minutes.
But here’s the math: if your time is worth $50 per hour, and you’re spending 30 minutes per image, that’s $25 per image. Plus your sanity. Plus the learning curve. Plus the inconsistency while you’re still learning.
The Professional Route
Services like Pic Visual charge $1-3 per image, deliver in 24-48 hours, and handle everything consistently. They’ve edited thousands of images and know exactly how to make your products look their best.
When David started his men’s shirt business, he tried doing it himself for the first month. He spent every evening editing photos instead of growing his business. Then he discovered Pic Visual’s ghost mannequin photo editing services. For less than he was spending on coffee each month, he freed up 20 hours and got better results.
My honest advice? If you’re shooting less than 10 products per month and enjoy learning Photoshop, try DIY. If you’re shooting more than that or want to focus on growing your business, outsource it. Your time is valuable.
The Different Styles (And When to Use Each One)
Not all ghost mannequin photos are created equal. Depending on your brand and products, different styles work better. Let me break down the main options.
The Natural Hollow Effect
This is the most popular style, and for good reason. It shows the interior of the garment—you can see the collar tag, the inside stitching, the lining. It looks three-dimensional and realistic, like the garment is actually being worn by an invisible person.
Use this for: dress shirts, blouses, jackets, anything where interior details matter.
The hollow man effect services from Pic Visual specialize in this exact style.
The Complete Invisible Look
This version fills in the neck and arm openings completely, so the garment looks perfectly closed. There’s no hollow interior showing—just a clean, polished look.
Use this for: t-shirts, sweaters, casual tops where interior details don’t add value.
The Neck Joint Service
This is a specialized technique where you show both the exterior and interior of the collar area. It’s perfect for formal shirts where customers want to see the tag placement, size label, and collar construction.
Check out Pic Visual’s photo neck joint service for examples of this technique done right.
Shadow or No Shadow?
Here’s another decision: do you want a soft shadow under your product or a pure white background?
Shadows add depth and make the product feel more real. No shadow creates a cleaner, more modern look. Most e-commerce platforms work with both, but Amazon and similar marketplaces often prefer pure white backgrounds.
Real Talk: What This Actually Costs
Let’s talk numbers. I’m going to be completely transparent here because I wish someone had been transparent with me when I started.
Equipment Setup (One-Time Cost)
- Basic mannequin: $50-150
- Tripod: $30-80
- Two softbox lights: $100-200
- White backdrop: $20-50
- Total: $200-480
Photography (Your Time)
- Learning curve: 10-20 hours initially
- Per product shooting time: 15-30 minutes once proficient
- Your time value: You decide what this costs
Editing Options
Option 1: DIY
- Photoshop subscription: $10-55/month
- Your time: 15-45 minutes per product
- Quality: Improves with practice
- Consistency: Variable at first
Option 2: Professional Service
- Cost: $0.89-3.00 per image
- Turnaround: 24-48 hours typically
- Quality: Consistently professional
- Your time investment: Upload and download, that’s it
What Most Successful Sellers Do
From talking to dozens of online store owners, here’s the pattern I see: they start by shooting their own products (DIY photography) but immediately outsource the editing to professionals. This gives them control over the creative process while ensuring consistent, high-quality results.
The math makes sense. If you can shoot 20 products in an afternoon but editing them would take 10-15 hours, spending $40-60 to have them professionally edited saves you money and delivers better results.
The Mistakes Almost Everyone Makes (And How to Avoid Them)
I’ve seen people make the same mistakes over and over. Let me save you the trouble.
Mistake #1: Moving the Camera
This is the biggest one. You shoot the mannequin photo, then accidentally bump the tripod while removing the garment. Now your interior shot doesn’t line up. The entire image is ruined.
Solution: Mark your tripod position with tape. Use a remote shutter release so you don’t touch the camera. Treat the tripod like it’s made of glass.
Mistake #2: Inconsistent Lighting
You shoot half your products in the morning with natural light, the rest at night with artificial light. Your catalog looks like it came from three different stores.
Solution: Create a lighting setup you can replicate. Take photos of your setup. Write down your camera settings. Be boringly consistent.
Mistake #3: Rushing the Preparation
You skip steaming the garment because you’re in a hurry. You leave a tag hanging out. You don’t notice the collar is folded weird. Now you’re stuck trying to fix it in post-production (which takes three times longer than doing it right initially).
Solution: Spend an extra five minutes on prep. Your future self will thank you.
Mistake #4: Shiny Mannequins
Someone sold you a glossy white mannequin. Great, except now you have weird light reflections all over your photos that are nearly impossible to remove.
Solution: Use matte finish mannequins. If you’re stuck with a shiny one, you can sometimes dust it with baby powder to reduce reflections.
Mistake #5: Poor File Organization
You shoot 50 products and name them IMG_001.jpg through IMG_100.jpg. Good luck figuring out which interior shot matches which exterior shot when you’re editing at midnight.
Solution: Use descriptive, consistent file names. “ProductName_Front.jpg” and “ProductName_Front_Interior.jpg” will save your sanity.
When Ghost Mannequin Photography Makes Sense (And When It Doesn’t)
Let’s be practical. Ghost mannequin photography isn’t the answer to everything.
It’s Perfect For:
Shirts, blouses, and tops—absolutely. This is where ghost mannequin shines. Customers need to see the collar, the fit, the drape. A floating shirt conveys all of this instantly.
Dresses and jackets—yes, especially formal wear and structured pieces. The 3D effect shows customers exactly how the garment will hang.
Pants and jeans—definitely. Showing the waistline, the leg taper, the overall fit helps customers make confident decisions.
Activewear and sportswear—for sure. These garments need to show their fit and flexibility.
It’s Not Ideal For:
Small accessories—things like scarves, jewelry, or hats usually work better as flat lay or styled shots. Ghost mannequin is overkill.
Items requiring lifestyle context—if you’re selling outdoor gear or adventure clothing, you probably want to show it being used in real situations, not floating on a white background.
Ultra-delicate or sheer fabrics—sometimes these look strange when shown hollow. A skilled retoucher can handle it, but it might not be worth the effort.
The Smart Approach: Mix and Match
Most successful brands use ghost mannequin for their main product listing images (the ones that show up in search results and category pages) and supplement them with other types of photos.
Emma runs a sustainable fashion brand. She uses ghost mannequin for the first image on every product page (so customers immediately see the fit), then follows up with model photos showing the garment in real life, and flat lay shots highlighting fabric texture and details.
This combination gives customers everything they need to make a purchase decision.
How to Actually Get Started (Your Action Plan)
Enough theory. Let’s talk about what you should actually do next.
If You’re Brand New to E-Commerce:
Start simple. Shoot your first 5-10 products yourself using the basic equipment I mentioned earlier. Upload your images to Pic Visual for professional editing. This lets you test the entire process without a huge investment.
Watch how the professionals edit your images. You’ll learn what makes a great ghost mannequin photo just by seeing the before and after.
If You’re Already Selling:
Identify your top 20% of products (by revenue). Reshoot just those products using ghost mannequin photography. This gives you the biggest impact with the least effort.
Test the results. Compare conversion rates, return rates, and customer feedback. If you see improvement (and you probably will), expand to more products.
If You’re Scaling Fast:
Set up a consistent photography process. Shoot all your products using the same equipment, same setup, same process. Then, build a relationship with a professional editing service like Pic Visual’s fashion photo retouching service.
The key to scaling is consistency and efficiency. You can’t grow if you’re spending all your time editing photos.
A Sample Timeline:
Week 1: Order equipment, set up your shooting space, practice with 2-3 test products.
Week 2: Shoot your first batch (10-20 products), send them for professional editing.
Week 3: Receive edited images, upload to your store, start tracking metrics.
Week 4: Refine your process based on what you learned, shoot the next batch.
Within a month, you’ll have a working system that you can scale indefinitely.
The Technology That’s Changing Everything
Here’s where things get really interesting. The ghost mannequin industry isn’t standing still—it’s evolving rapidly.
AI-Powered Enhancements
New services are emerging that can do more than just remove mannequins. They can actually transform your mannequin photos into images that look like they were shot on real models.
Pic Visual’s neck joint service for converting mannequins into AI models is a perfect example. You shoot on a mannequin (keeping costs low and consistency high), but the final image looks like it was shot on a professional model.
This is game-changing for smaller brands that want the professional look of model photography without the cost.
The Evolution of 3D
The industry is also moving toward full 3D visualization. Instead of just front and back views, some services can now create 360-degree rotatable images from just a few source photos.
To understand where this technology is headed, read about the evolution of 3D ghost mannequin photography and how it’s transforming online shopping.
What This Means for You
The barriers to professional product photography are getting lower every year. What used to require a $50,000 studio setup can now be done with $500 in equipment and a $2 editing fee per image.
This levels the playing field. Small brands can compete with big retailers on visual quality. Your tiny boutique can look just as professional as major fashion houses.
The Real Impact: What Changes When You Switch
Let me tell you about Michael. He sold vintage-inspired men’s clothing online. For two years, he used basic hanger photos because he thought professional photography was too expensive.
His conversion rate hovered around 1.2%. Not terrible, but not great either. Returns were about 18%—customers complained that items “looked different in person.”
In August 2024, he invested in ghost mannequin photography for his entire catalog. The investment was about $800 (equipment plus editing for 200 products).
Within three months:
- Conversion rate: 3.1% (nearly triple)
- Return rate: 9% (cut in half)
- Average order value: up 22% (customers bought more confidently)
- Customer complaints: down 67%
The financial impact? An additional $34,000 in revenue over those three months, with lower return processing costs. The $800 investment paid for itself in the first week.
But here’s what Michael told me was most valuable: “I stopped losing sleep over customer complaints. People finally saw exactly what they were buying.”
That peace of mind? Priceless.
Can I use my iPhone for this?
Yes, but with caveats. Modern iPhones have excellent cameras—good enough for decent product photography. The real challenge is keeping everything consistent. Use a tripod adapter for your phone, use the same lighting every time, and you can get acceptable results.
That said, if you’re serious about e-commerce, investing in a basic DSLR gives you more control and better quality.
How long does the whole process take?
For one product, from setup to final edited image:
Photography: 15-20 minutes (once you’re practiced)
Professional editing: 24-48 hours turnaround
Total active time investment: About 20 minutes
What if my products don’t fit standard mannequins?
Plus-size clothing? Children’s wear? Oversized items? There are specialized mannequins for everything. You can also use styling techniques to make garments fit mannequins they’re not perfectly sized for—clips, pins, and strategic positioning work wonders.
Do I really need to shoot the interior?
For most tops and jackets, yes. The interior shot is what creates the 3D effect and shows depth. For items like simple t-shirts or pants, you can sometimes skip it, but the result won’t have the same impact.
Can this work for other products besides clothing?
The technique was developed for clothing, but creative photographers use similar approaches for bags, hats, shoes, and even some accessories. Anything that has a 3D shape can potentially benefit from this technique.
What about the ghost mannequin images 360-degree video?
Great question. Some brands are now creating rotating video versions of their ghost mannequin images 360-degree spins that let customers see every angle. It’s the next evolution of this technique.
The Professional Services Landscape (What to Look For)
If you decide to outsource your editing—and I recommend you do—here’s what separates good services from great ones.
Quality Indicators:
Consistent Edge Work The biggest tell of amateur editing is rough, pixelated edges. Professional services like Pic Visual’s high-end fashion retouching services produce smooth, natural-looking edges that you can’t even tell were edited.
Natural Shadows Shadows should enhance the 3D effect, not distract from it. They should be subtle and consistent with your lighting setup.
Color Accuracy Your red shirt should be the same shade of red in every edited image. Color consistency is harder than it looks and separates professionals from amateurs.
Turnaround Time Fast doesn’t always mean good, but professionals have streamlined workflows. Expect 24-48 hours for standard work, with rush options available.
What to Avoid:
Services that won’t show you samples before you commit. If they’re confident in their work, they’ll happily show you before and after examples.
Unrealistically cheap pricing. If someone offers editing for $0.10 per image, they’re either cutting corners or using completely automated processes that won’t handle your specific needs.
Poor communication. You should be able to easily specify what you want, ask questions, and get clear answers.
The Pic Visual Difference:
I’ve worked with several editing services over the years, and Pic Visual stands out for a few reasons. They specialize in apparel (not generic photo editing), they offer specialized services like editorial retouching for high-end brands, and they understand e-commerce requirements.
More importantly, they scale with you. Whether you’re editing 5 products or 500, the quality stays consistent.
Their complete guide to ghost mannequin photography for e-commerce success covers everything we’ve discussed here and more.
Advanced Tips for When You’re Ready to Level Up
Once you’ve mastered the basics, here are some advanced techniques that can take your ghost mannequin photography from good to exceptional.
The Multi-Angle Approach
Instead of just front and back, shoot multiple angles: front, back, both sides, and detail shots. This gives customers a complete view of the product. It also gives you content for different uses—main listing image, gallery photos, social media posts.
Styled Ghost Mannequin
Who says ghost mannequin has to be plain? Layer a jacket over a shirt. Add a belt to pants. Create styled looks that show customers how to wear the pieces. This increases average order value because customers see complete outfits.
Seasonal Variations
Consider shooting the same product in different contexts. A lightweight jacket might look different styled for spring versus fall. This gives you fresh content without shooting entirely new products.
Detail Integration
Combine ghost mannequin with close-up detail shots. Start with the full ghost mannequin image, then add close-ups of fabric texture, buttons, stitching, or other details. This comprehensive approach answers every question a customer might have.
Measuring Success (Because Numbers Don’t Lie)
How do you know if ghost mannequin photography is actually working for your business? Track these metrics:
Conversion Rate The big one. What percentage of visitors buy? Compare before and after implementing ghost mannequin photos.
Return Rate Are customers keeping what they buy? Lower returns mean your photos accurately represent your products.
Time on Page Are customers spending more time on product pages? This suggests they’re engaging with your images.
Cart Abandonment Are fewer people abandoning their carts? Better product visualization increases purchase confidence.
Customer Questions Are you getting fewer questions about fit, size, and appearance? Your photos are doing their job.
Set up simple tracking in your e-commerce platform. Most platforms (Shopify, WooCommerce, BigCommerce) have built-in analytics that show these metrics.
The Future of Product Photography (Where This Is All Heading)
The ghost mannequin technique you’re learning today is just the beginning. Here’s where the industry is going:
Virtual Try-On Technology
Customers will soon be able to upload their photo and see your products on their actual body. This combines ghost mannequin photography with AI to create personalized shopping experiences.
Automated Editing
AI is getting better at removing mannequins and combining images. While professional human retouchers still produce better results, automated tools are improving rapidly and will eventually handle simple edits perfectly.
3D Modeling from Photos
Take a few ghost mannequin photos, and software creates a full 3D model that customers can rotate, zoom, and examine from any angle. Some services are already offering this.
Augmented Reality Shopping
Imagine customers pointing their phone at their room and seeing your product floating in front of them at actual size. This is coming sooner than you think.
The point? The skills you’re learning now—how to photograph products professionally, how to show fit and drape, how to create compelling product images—will remain valuable even as the technology evolves.
Taking the First Step (Starting Today)
Everything I’ve shared with you comes down to one simple truth: your product photos are either helping you sell or preventing you from selling. There’s no middle ground.
If you’re reading this, you already know your photos could be better. Maybe you’re using flat lay and your conversion rate is suffering. Maybe you tried hiring models and the costs are unsustainable. Maybe you’re doing okay but you know there’s room for improvement.
Here’s my challenge to you: pick three of your best-selling products and try ghost mannequin photography this week.
You don’t need to overhaul your entire catalog. You don’t need to spend thousands of dollars. Just three products. Shoot them using the techniques I’ve outlined. Send them to Pic Visual for professional editing. Upload the new images. Watch what happens.
My bet? You’ll see a difference within days. Higher engagement. More confident purchases. Fewer returns. And you’ll wonder why you didn’t do this sooner.
Your Next Action:
Go to Pic Visual’s ghost mannequin service for ecommerce brands right now. Look at the before and after examples. See the quality of work. Get a quote for your first batch.
Or, if you want to learn the complete process from shooting to editing, check out their comprehensive invisible mannequin guide.
The opportunity is right in front of you. Your products are already great—now it’s time to show them that way.
It’s About More Than Just Photos
I want to leave you with something important: ghost mannequin photography isn’t really about photography at all.
It’s about trust.
When a customer lands on your product page, they’re looking for reasons to trust you. They can’t touch the fabric. They can’t try it on. They can’t see it in person. All they have are your photos.
Professional ghost mannequin images say: “We care about how we present our products. We want you to know exactly what you’re getting. We’re confident enough in our quality to show it clearly.”
That message of care and confidence? That’s what converts browsers into buyers.
Sarah, the Portland boutique owner I mentioned at the start? She sent me a message last month. Her business has grown to the point where she’s hiring her second employee. She credits ghost mannequin photography as the turning point—not because it was magic, but because it finally let her customers see what she’d been trying to show them all along.
Your products deserve to be seen properly. Your customers deserve to shop with confidence. And you deserve to build a business that grows sustainably.
Ghost mannequin photography can help with all three.
The question isn’t whether you should do this. The question is: when will you start?
Resources to Get Started:
- Main Hub: Pic Visual
- Ghost Mannequin Services: Professional Invisible Mannequin
- Editing Services: Photo Editing Specialists
- Advanced Techniques: High-End Retouching
- Model Conversion: Transform Your Photos
External Learning Resources:
- Shopify’s Photography Guide: https://www.shopify.com/blog/product-photography
- Adobe Photoshop Tutorials: https://helpx.adobe.com/photoshop/tutorials.html
- E-Commerce Image Guidelines: https://sellercentral.amazon.com/gp/help/1881
- Product Photography Best Practices: https://www.bigcommerce.com/blog/product-photography/
Ready to transform your product photography? Visit Pic Visual today and see the difference professional ghost mannequin services can make for your e-commerce business.
About This Guide
This comprehensive guide was created to help e-commerce entrepreneurs, fashion brands, and online retailers understand and implement ghost mannequin photography effectively. Whether you’re just starting out or looking to improve your existing product photography, these techniques and insights will help you create images that convert.
For personalized assistance with your specific photography needs, reach out to the team at Pic Visual—they’ve helped thousands of brands elevate their product photography and can help you too.
Last Updated: January 2026
© 2026 Pic Visual. This guide is provided for educational purposes to help e-commerce businesses succeed with professional product photography.

